Satins and Sateens (Part I)
Marcy Petrini
May, 2017
In the current issue of Shuttle Spindle & Dyepot (Issue 190 Summer 2017), Penny Morgan in her President’s letter showed a beautiful fabric and briefly mentioned satin and sateen.
The question came up: how do you weave a satin? And how do you weave a sateen?
A satin is an unbalanced weave: one side is weft-dominant, sometimes referred to as the “sateen” side (left fabric below), the other side is warp-dominant, referred to as the “satin” side (right side below). Of course, once off the loom, this distinction doesn’t matter; by looking at the fabric below, there is no way of telling which side was up on the loom. But generally, for ease of treadling, we often lift the fewer shafts possible, thus weaving the sateen side up.
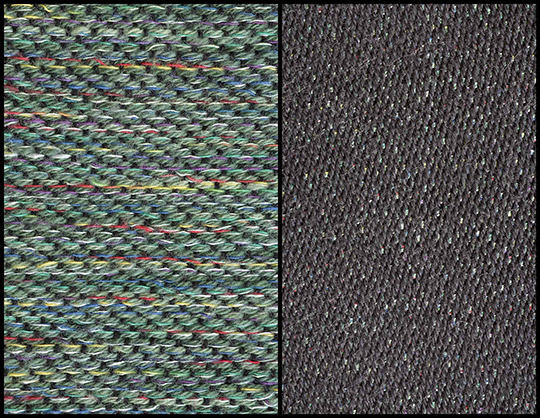
From the fabric, we can see that the floats are not organized; they are interrupted or stitched down intermittently by a single warp thread; we start with a straight draw and stitch it by a step. There are a rules on how to obtain possible steps.
We need at least 5 shafts to weave a satin, for reasons that become clear when we look at the rules for the steps. And not all straight draws above 5 can be woven as satins; 6, for example, can’t. Here is why:
|
Rules |
Example for 5-shaft satin |
No 6-shaft satin |
|
Start with a straight draw for n number of shafts, with n at least 5 |
1, 2, 3, 4, 5 |
1, 2, 3, 4, 5, 6 |
|
Do not use a step number of n because it wouldn’t allow any threading |
Step cannot be 5 |
Step cannot be 6 |
|
Do not use a step number of 1 or (n - 1) since it wouldn’t change the straight draw |
Step cannot be 1 or 4 |
Step cannot be 1 or 5 |
|
The step number cannot have a common factor (mathematically) with n |
2 and 3 do not have a common factor with 5 |
2, 3 and 4 are factors of 6 |
|
The remaining integers can be used as steps |
Step of 2 or 3 are possible |
There are no step left! |
Here is how we apply the steps, using as an example the 5-shaft satin and the two possible steps:
|
Step of 2 |
Step of 3 |
|
1 |
1 |
|
1 + 2 = 3 |
1 + 3 = 4 |
|
3 + 2 = 5 |
4 + 3 = 7 – 5 = 2 |
|
5 + 2 = 7 – 5 = 2 |
2 + 3 = 5 |
|
2 + 2 = 4 |
5 + 3 = 8 – 5 = 3 |
|
4 + 2 = 6 – 5 = 1, the starting point |
3 + 3 = 6 – 5 = 1, the starting point |
|
Threading: 1, 3, 5, 2, 4, repeat |
Threading: 1, 4, 2, 5, 3, repeat |
It doesn’t matter which step we use, the fabrics are very similar, as shown in the following drawdown, black warp is a step of 2, blue warp a step of 3; the first half of the treadling produces the sateen side, the second half the satin side.

Click here for the full-sized draft draft for this 5 shaft satin (a PDF will open in a new window).
Are steps for 7 and 8 shaft satins possible? Yes! Do you see why? And do you see why we cannot have a 4-shaft satin? It is also possible to thread a straight draw and apply the step to the treadling. How does that fabric differ?
Next blog will address the answers to these questions and more.
Please email comments and questions to
The Finished Plaited Twill Shawl
Marcy Petrini
April, 2017
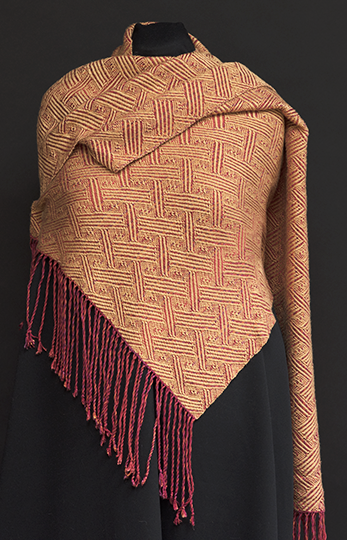
In the September 2016 blog I posted the draft of a 40-shaft plaited twill which I had hoped to weave. Eventually I did. I finished it a few weeks back and now Terry has taken some pictures. I really like the shawl.
For warp I used sea silk, 70% silk, 30% seacell (437 yards = 3.5 oz.), color Sangria, space-dyed reds, with stripes of the color Violetta, solid red. I set it a bit openly, 12 epi so that the larger weft, 2/5 Gemstone silk (260 yards = 3.5 oz.) in color Rose Gold allows the pattern to show well.
Here is a photo of the shawl. You can see that the plaiting, sometimes called braiding, is asymmetrical and I like that.
a close up:

Then I wondered whether I really needed such a difference in the grist of the warp and weft for the pattern to show. So, I decided to weave it with a smaller weft.
I didn’t have enough of the sea silk for another shawl, but I had enough of the Violetta for a scarf. This time I set it at 18 epi and used 8/2 silk in gold from my stash (416 yards = 3.5 oz.). That warp is still on the loom, and the pattern does show… stay tuned, a comparison is coming up.
Please email comments and questions to
Record Keeping
Marcy Petrini
January, 2017
Happy New Year! It always seems that it takes a bit of time to get back on track after the holidays, especially since I don’t think of the season being over until after Roc Day. In my native Italy, as a child, Epiphany concluded the holidays, so I am grateful that in the Gulf Coast states we celebrate Roc Day, which technically is January 7, the day after Epiphany, when allegedly women returned to their fiber crafts. After Roc Day, I can get back to “normal.”
We usually celebrate Roc Day the first Saturday of January after the New Year weekend, but this year we were lucky that the first Saturday was indeed on January 7th. What we weren’t so lucky about was the weather – snow, yes, snow, in Mississippi and heavy rain, some places freezing, in Mississippi and Louisiana, prevented some from attending the fun. But the Spinners and Weavers of Imperial Calcasieu Guild of Lake Charles, LA, organized a wonderful day at Dry Creek Baptist Camp, Dry Creek, LA, in a remote and peaceful setting.
Now I am back to the big project that I started a year and an half ago: cataloging all of my work, pieces and samples. It seems wasteful of time, but I find it very helpful for my teaching, writing, and for recalling yarns, setts, beats and any problems I may have encountered in the past.
I use this spreadsheet or a modification of it, depending on what I am weaving, for every piece that I make:
The spreadsheet for planning a weaving project (click on this link to download the Excel spreadsheet)
n.b. This file will launch a new window or tab, prompting action on your part.
In Microsoft's Edge, a box will open.
In Mozilla's Firefox, a new window will open.
In Google's Chrome, a tab will appear at the bottom of the browser.
When teaching, we often don’t have access to a computer, so we use a printed form and then we do the calculations by hand:
The form for manually planning a weaving project (a PDF will open in a new window).
In addition to the information in the spreadsheet, I add a drawdown if the structure warrants it. At the end, I add a snapshot of the piece. I print everything and I attach yarns. The reason for printing is that photographing the yarns is not enough, I really need to see them and feel them. Also, should something happen to the computer, at least I would have a printed copy, even though files are backed up electronically daily.
Once all that is done, I add the piece to a database that includes an access number, title, how it was woven, warp and weft yarns and their colors, piece location and any notes that I may want to remember. The few pieces that I have given away don’t appear there, I have a separate listing. This seems laborious, but it’s not, it takes just a few minutes.
The spreadsheet makes it easy to search; for example, if I want to know in which pieces I used 20/2 silk and how I set it for a variety of structures.
The access number was a brain child of my husband, who was frustrated when he had to wait around to photograph pieces, as I fumbled searching for them and then realizing that what I had given him wasn’t what I thought it was. After forty years of weaving, well, there are a lot of pieces named “red silk shawl”.
This is the access number of a scarf I finished this fall:
WV 20160405 20161010 Deflected Doubleweave Scarf
The WV indicates weaving, since I also catalog spinning and knitting; 20160405 is the starting date – year, month, day – meaning when I started planning it, not weaving it. The 20161010 is the ending date, which is the day when the wet finishing was done, snapshots were taken, the spreadsheet was printed, and the piece was entered in the database. The last part of the access is obviously the name.

Here is the front and back of the fabric – these are not my snapshots, they are Terry’s photography.
I have used some form of record keeping, since I started weaving, a suggestion made by my first weaving instructor. So, once I started the database, it was easy enough to go backwards to enter all of the pieces I still have. Or so I thought.
Sometimes in the early 2000 I started using electronic planning sheets, but not rigorously until 2004. Thus it was easy to build the database going backwards, until about 2004. Further back I had to rely on planning sheets filled by hand – which would have been fine, except I realized what an incredible poor record keeper I had been! I am back to the 1990s, and I have yet to find a single complete planning sheet. Dates are missing, yarns are attached but not labelled, and notes are legible but incomprehensible. There are some pieces that I really want to find because they are illustrative and educational, and this has been a very frustrating, long and maddening chore.
My suggestion is: use a planning sheet of some kind, either the one attached or one of your own making; keep careful notes because years down the road, you won’t remember that yarn, you won’t know the sett, and you will have forgotten what your impression of the work was at the time. Did you like it? What would you do differently if you were to repeat it? There is nothing like personal experience and a good way to recall it.
Please email comments and questions to
Trying Something New
Marcy Petrini
March, 2017
Do you remember the awkward feeling when you started to weave? Having to look up how to do the next step, not been able to figure out why something didn’t look right, or thinking, as one of my student once told me, “I don’t even know what I don’t know.” But there was also the satisfaction of having accomplished something pretty special. “It’s magic”, I tell my students, “we have a bunch of threads and we turn them into cloth.”
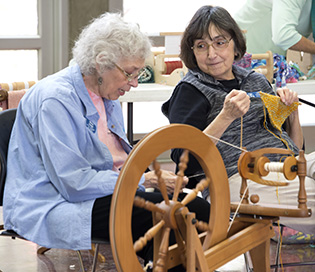
The feeling of satisfaction has stayed with me, but I must admit that my awkwardness with weaving has gone, and that’s true for many people who weave regularly once they have woven for a while. “How hard can it be?” seems to be the replacement feeling. And that may be fueled by the general public. When we demonstrate spinning – and we just had our sheep to shawl demonstration earlier this month – people come up to us, see us seamlessly draft our fiber which turns into thread and is wrapped into the bobbin, and ask: “so, all you do is just hold that fiber in your hand, right?” (Here I am spinning while my friend Guild President Gio Chinchar is knitting).
But in teaching, especially beginning weaving, I found that it’s not good not to remember that awkward feeling. I don’t want to think “How hard can it be?” I want to remember what it was like starting out with cones of yarn, a loom, various tools – and a wonderfully patient teacher.
A while back, I realized that I could recapture that awkward feeling by starting something new. I stumbled on the thought when I decided to take a white oak basket weaving class. How hard can it be? I thought, I already know how to weave. Wrong! White oak weavers, as they call them, don’t bend like yarn! I still love baskets, but instead of making them, I support my fellow basket weavers. But the idea was born: every couple of years, I should learn something new – or, rather, I should say, I would attempt to learn something new, just to have that awkward feeling. Most of the activities stop at a class, like the basketry, others lingered a bit longer, like crocheting, until I decided that I would rather knit after all. The topics are not always fiber related, since at work one of my tasks was teaching, so I had the same issue. Sometimes the topics are self-taught, as in the early 1980s when I learned a new-to-me computer language called Pascal for work, and then I used it to write a computer program to do a drawdown.
And then there are the few new skills that stick. In the mid-80s, one of our members was going to teach a spinning class for our Chimneyville Weavers Guild – was I interested? This was going to be a big commitment since she had no extra wheels, so each participant would have to buy one. My husband convinced me that a wheel could be sold if I decided I didn’t like spinning, and anyway I may need it to ply yarns for my weaving. First we tried spindling, not my favorite; then she taught us to card; I saw it as a necessary step to the final goal. But once I started spinning on a wheel, I was hooked. I wasn’t the only one; our guild was eventually renamed the Chimneyville Weavers and Spinners Guild (CWSG).
Now it happened again – this time with kumihimo braids. In January, CWSG member (and HGA 1st Vice President) Kathy Perito presented a mini workshop on braiding. I decided I should participate, although I had seen people at Convergence and Kathy braid, and it seemed impenetrable. How do you know where to move all of those strands of yarn? But soon I found that the step-by-step rhythmic movement of the strands is mesmerizing and addictive.
I prefer a disk, as I love to sit at the end of the day braiding curled up on the coach with a glass of bubbly and a cat. I am slow, and I have only made eight-strand round braids so far – 6 of them – but every time I do one, I learn a little bit more. And isn’t this how we become proficient at our crafts? Here are a few of my braids:

Please email comments and questions to
Birds of a Feather Exhibit
Marcy Petrini
February, 2017
At the December meeting of the Chimneyville Weavers and Spinners Guild, the inspiration for our 2017 show was announced: “Birds of a Feather”. Our Guild member (and Craftsmen’s Guild of Mississippi president) Sharon Williams will mount the exhibit on March 1, so I didn’t have much time to plan and execute a project.
Luckily, birds are very colorful, so it’s not hard to match bird to yarn – or finished product to a bird!
A triangular shawl that I knitted with handspun late last year is going to the show; I had taken all yarns of silk and wools, other animal fibers and bamboo that I had been spinning and knitted them together. I was unsure how large of a piece the yarn I had would make. I could have knitted a sample and made the appropriate measurements, but I chose to improvise. I knew I had enough to make a shawl, I just didn’t know how big. In such cases, I make a triangular shawl, starting at the bottom and knitting up until I run out of yarn.
The needle size should be approximately 3 times the grist of the yarn. To figure it out, then, I take 3 strands of yarn and using a knitting needle gauge, I find the hole into which the 3 strands fit comfortably, not too tight, but not too lose. In the example below, using a commercial yarn, three strands fit into the size 10 needle hole. This is a good place to start.

For this project, there were yarns that were thicker than others. I decided to alternate two rows of the thicker and two rows of the thinner yarns; as I ran out of one yarn, I substituted a similar one. That way the transition in yarn color is pretty gradual. For yarns that were thinner yet, I used two strands together.
To knit, I start with one loop, then I knit in the front and back (Kf&b) of the loop so I have two stitches. For the third row, I knit 1, and Kf&b in the 2nd stitch. Now there are three stitches. From that point on, I knit 1, Kf&b, then knit to the end. Thus I increase one stitch at the beginning of every row to make the triangle.
The combination of the colors in each yarn, the colors of the alternating yarns, the colors of the yarns as they are substituted makes for a very bird-like appearance, I think.
The colors in birds’ feathers are not all pigments, but are structural coloration; that is, there is interference of the wave lengths of light as they bounce off the microscopic structures of the feathers. Did you ever see a rainbow on the surface of an oil patch after a rain? Then you have seen wave interference. You know those colors weren’t in the oil.
Since I knit until I run out of yarn, I have to make sure that I have enough to cast off. Toward the end, I measure a length of yarn that is 4 to 5 times the width of the piece and mark it, and then I make sure that I don’t knit past the marker. That rule of thumb works well for large size needles – I was using 11; for smaller needles, 3 to 4 times the width is sufficient.
Here is the shawl. It will be exhibited at the George Berry Gallery at the Mississippi Craft Center. Does it remind you of a bird?

Please email comments and questions to