Scale and Float length
Marcy Petrini
3/14/2016
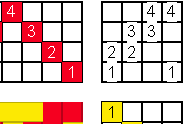
Two weeks ago we talked about the threading that appears below in the drawdown. Three repeats are shown, each repeat is 10-thread long. We talked about scale: if the sett is 10 ends per inch, the repeat will be 1” wide (10 thread repeat divided by 10 ends per inch = 1”).
Related to scale is the length of the float: the larger the pattern, the longer the floats, for any given pattern. We know this, of course, but, like scale, we may forget to consider it. The treadling is needed to assess float length, since the floats are formed in the weaving. We need to think about warp and weft floats.
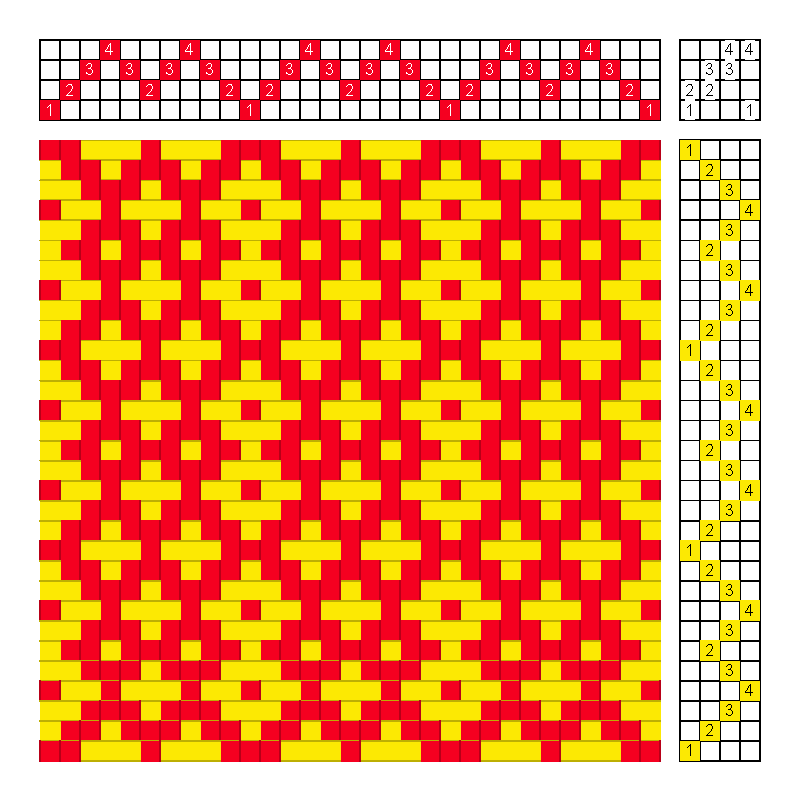
The drawdown of this twill is shown as tromp as writ. To determine float length in inches (and fractions thereof) first we need to determine thread float length. Drawdown software may provide such analysis, but really, it is rather easy to figure out.
The drawdown shows clearly the horizontal red lines that represent the warp and the vertical yellow lines that represent the weft. Let’s first look at the warp ends. Each red square is a single warp float. Follow the analysis by looking at this section of the drawdown:
The first warp thread is on shaft 1.Only single red squares appear, thus, floats are only one-warp long.
The warp end on shaft 2 has the following floats, starting from the top of the drawdown: 2, 1, 3. Only one repeat of the treadling is needed for analysis, but the joint between the first and second repeat is important; it is, in fact, here that the 3-thread float occurs.
For shaft 3 we have: 2, 3, 2 thread floats.
For shaft 4: 3, 3 thread floats.
Thus, for the warp, the maximum warp length float is over 3 threads.
Next, we analyze weft floats, the yellow horizontal lines; each yellow square is a single weft float. Again, follow the analysis by looking at this particular section of the drawdown:

For the first shot (1 & 2), the weft float length is 3 threads; for shaft 2 only single thread floats. On shaft 3: 2, 1, 3; on shaft 4: 2, 3, 2
Thus, the maximum weft length float is also over 3 threads.
This process sounds laborious, but it doesn’t have to be; make the drawdown high contrast in color and the longest length and width of the colors will become more obvious; focusing on the longest red lines, we easily see that there are no warp floats longer than 3; similarly, looking at the longest yellow lines shows that there are no weft floats longer than 3 threads.
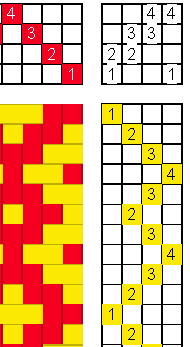
We do have to remember, however, that longer floats may be occurring underneath the cloth. Any time that we have two or more warp ends next to each other, as it occurs in the first shot shown below, there is an equivalent float underneath the cloth, in this example, a two-thread yellow weft float.
If you have trouble visualizing what floats lurk underneath the cloth, do a drawdown exchanging shaft movement: if the original drawdown was for a rising shed loom (as in the case here), repeat it for a sinking shed loom and vice versa. Below is the sinking shed drawdown, the underneath of the fabric; note, at the first shot, the two-thread yellow weft float that we just talked about.

There are no floats longer than 3 threads for either the warp or the weft.
Once we have determine the float length in threads, we can convert it to inches, using the sett for the weft floats and the beat (picks per inch) for the warp floats.
For example, using the sett of 10 ends to the inch we mentioned above, where the pattern will be 1” wide, the weft float over 3 warp threads will be about ⅓”; whether this is acceptable or not depends on the final use of the fabric. At a sett of 20 epi, the pattern is less visible at ½” wide, but the floats are minimal at 0.15”.
We can do the same approximation for the warp floats based on the beat, which may or may not be the same as the sett.
With a little planning, we can get the pattern in the size we want with acceptable floats.
Please email comments and questions to
Why Do I Practice the Crafts I Do?
Marcy Petrini
3/7/2016
Did you think about why you practice the crafts you do (as I discussed the last two weeks)? In preparation of the program for the Chimneyville Weavers and Spinners Guild that we have been discussing, I went down memory lane and thought – again – about my reasons. I know that they have changed over the years.
I knit on the road, short or long trips as a passenger in the car, or on plane trips away from home. Knitting was the very first craft I learned, before I even went to school; eventually, though I abandoned it because I couldn’t find anyone to help me progress; my Mom had shown me how to cast on, knit and cast off and that was the extent of her knowledge. So I took up embroidery and sewing at which many of my family members excelled, and later crocheting, mostly self-thought. No idle hands here. In college I found knitters who could help me; I learned various patterns, how to design garments, and later the characteristics of the various yarns. Eventually I realized how time consuming knitting could be and given that I had limited amount of free time after work and family, I preferred to spend that time at home weaving. Still, I enjoy the color interplay of the knitting and designing with squares (see below); it is work that I can do mostly on “autopilot” once I plan it. I don’t leave home without my knitting.

I watched spinning for many years and promised myself that I wouldn’t add one more craft – I was weaving, I continued to knit, I had learned to dye, I was still embroidering and crocheting and I even wove a basket occasionally. But in the late 1980s, a Guild member offered us the chance to learn to spin; she was a terrific spinner, but she had no extra spinning wheels; taking the class meant making the commitment of buying the equipment.
I vacillated, but eventually I caved in, mostly on the encouragement of my husband Terry Dwyer who offered to finish a wheel kit to keep costs down; he figured I could always sell it if I didn’t like it. Spindling never took, but once I started on the wheel – despite the frustrations of a beginner – I loved it. For the next 10 years or so, I took classes at conferences and learned to do all the things that good spinning requires: spinning to a standard, measuring twists per inch, different plies, working with various fibers. With spinning, too, I realized that I couldn’t relax with my husband at the end of the day, carry on a conversation and count treadles; that had to be done at another time, again time when I would rather be weaving. So, now I settle for serviceable yarn – if it doesn’t fall apart, it’s yarn! And I like nothing better to do than spin and sip wine while relaxing with my husband and cats near me at the end of the day. And it’s fiber that I love, I need to try them all (milk protein shown below.)
Weaving, I am convinced, is in my genes. After her death, I found out that my grandmother spun and wove household textiles mostly out of necessity, in pre-World War II Lithuania. As a child in Italy I loved the gorgeous tapestries, but I didn’t even realized that they were woven, I thought they were embroidered. Similarly, visiting the Lithuanian embassy in Rome for special events, I admired the beautiful textiles of the national costumes and thought they, too, were embroidered (Tied-Lithuanian is a tied weave in the same class as summer and winter; floats are formed by the pattern weft).
In graduate school weaving was my sanity. Over the years I took classes whenever I could and tried things on my own. I joked that I didn’t sample, because everything I did was a sample. Once I started teaching in 1981, my weaving was spurred on by my students who kept on asking questions for which I had no answer – but I could find out. The teaching led to writing, and now they feed on each other. Currently I weave samples – true samples – for classes and monographs and one-of-a-kind pieces, shawls and scarves, to apply a technique that I sampled and liked, or to use yarns that I want to try. Below is shawl that was in the leaders’ exhibit at Convergence® in 2012 in Long Beach, using the silk dyed for HGA in the conference colors.

Right now, I am knitting squares in mostly red for a Chimneyville Weavers and Spinners Guild show; spinning a cable yarn from buffalo fiber; weaving silk scarves on the 4-shaft loom, looking at scale when the size of the weft changes; and an 8-shaft pointed twill sampler on the multi-shaft loom, getting ready for Convergence® 2016 in Milwaukee, Wisconsin. The fun continues.
Please email comments and questions to
Planning and Evaluating a Project: II
Marcy Petrini
2/29/2016
Did you think about why you practice the crafts you do (as I discussed last week)?
Once you are clear on the reasons why you practice your crafts and on why you did a particular project, it’s time to proceed with the work and then evaluate it. Barry Bonds, the noted baseball player turned coach, recently talked about helping young players evaluate themselves and he said: “If you want self-evaluation, well, don’t be afraid of the truth.”
Nicely put; we do have to be honest in evaluating ourselves, but this is not the time to chastise yourself! That’s why the Evaluating a Project form has the question: “what is good about this piece?” right after you rate your overall satisfaction with:
![]()
These mean: “this project is a winner”, “I am happy”, “it’s OK”, “I am not happy”, “Kill this project”. Truly, it is seldom that a project really falls into the last category, but even if it did, there usually is something good about it, or at least a valuable lesson to learn.
Next, you should think about what you would do differently if you were to redo this project, and how the piece compares to what you expected it to be (more on this later). The specific items listed on the form should also be assessed. There may be others, but those are the most important.
From my many years of weaving and of teaching, I have concluded that there are five major reasons why our project don’t get a trophy or at least a happy face. These are primarily for weaving, but apply to other fiber crafts as well.
First, it’s craftsmanship; we make physical errors because we are unfocused, distracted, in a hurry, or tired; or we don’t think about, or maybe we don’t understand, the process and its limitations. Take time, both before the project to understand what you are about to do, and while doing; work by hand is slow, don’t rush it.
The second is that there is a mismatch between the item produced and the materials or techniques used; I have seen a “cardboard” sweater; an overshot skirt that looked like a blanket; a scarf the weight of a table runner; and placemats woven with wool. My most egregious error was in the early 80s. I had woven a wool ruana while I lived in a cold climate; I loved it, but I had moved to Mississippi, which has a much milder climate, so I thought a less cozy ruana would be more practical. In weaving a new one, I used the same yarn grist, sett, and pattern, substituting cotton and rayon for the wool. While the old wool ruana was light and fluffy – and warm – the new ruana was an armor! For the same yarn grist, the cotton is much denser and thus heavier; I should have used a much smaller yarn. Lesson learned. I moved on.
We already talked about unstated expectations last week. If you are transparent with yourself, you will be more likely to fulfill your expectations, no matter how lofty. But you are not likely to achieve expectations you didn’t set out to accomplish.
We talked about scale last week. You don’t need drawdown software to think about scale. Simple arithmetic can do the trick. For example, look at the threading of three repeats of the following twill:

One repeat is 10 threads long. If you were to sett the warp at 10 ends per inch (epi), the pattern would be 1” wide; you probably “knew” that, without consciously working through the simple arithmetic: 10 threads divided by 10 ends per inch equals 1”. Similarly, at a sett of 20 epi, the pattern will be ½”, just a simple 10/20 = 0.5”. Granted, most pattern repeats and setts don’t come out that even, but still, they are simple. A pointed twill has a repeat of 6 threads; for a yarn sett at 20 epi, the repeat will be about 1/3" wide. Most of us are visual people, though. Just grab a ruler and look at what 1/3" looks like; or draw it by hand on a piece of paper.
This brings us to the last reason why our project doesn’t meet our expectations: we didn’t visualize the end product. This one is unfair. It takes years of experience to look at a yarn, do a drawdown of the pattern, think about scale, love the colors and visualize what all of it together will look like, if you haven’t used all of those factors together before. I don’t think of this reason as a failure of the project, although I have heard this often as a complaint by people: “but it doesn’t look like the way I thought it would.” Get over it. If all of the design considerations and the craftsmanship are good, than the project is good. Try to figure out what the difference is between what you envisioned and the end product. It’s the only way to learn.
Possible reasons are the color interactions in weaving, especially if you looked at the yarns in a light that didn’t reveal the true color. A color may “pop” when you wanted it to blend, or it blends when you wanted it to pop. And pattern matters. Look at the figure below. Same colors in three color gamps, woven in plain weave, pointed twill and huck. The colors appear differently from being maximally blended in the plain weave vs. the floats of the huck.

Yarn may obscure the pattern. Yarn texture or variegation are the most obvious, but the distortion of warp and weft within the cloth can also be important. Look at the pointed twill drawdown on the left below; you can see blue crosses formed by 5 shots of weft with a warp dot in the middle. In the fabric on the right, woven with the same twill, the motifs become almost round because the top and bottom of the cross disappear with the fat, lofty warp pulling in. If I was set on wanting crosses, I could be disappointed. But it would be better to be happy with the blue-purple motifs in my cloth and learn why the crosses didn’t appear clearly.

It does take experience to visualize correctly, but it takes analysis as well.
Please email comments and questions to
Planning and Evaluating a Project
Marcy Petrini
2/22/2016
I was honored on Saturday to present a program to my local guild, the Chimneyville Weavers and Spinners Guild. In thinking about the topic, I drew on what I regularly do to plan at first, and then evaluate my own work at the end; I may not do it step-by-step as I had to present it by necessity, but the process is there.
Our group is very varied: weavers and spinners, with weavers who don’t spin and spinners who knit but don’t weave, and most people practicing other fiber crafts, like felting, quilting, sewing, basket weaving, needle work, etc. For that reason, I thought my presentation needed to be broader than just weaving, although as a spinner and knitter, I myself use the process of planning and evaluating for those fiber crafts as well.
A week or so before the program, I sent an e-mail to the group asking that they list all of the fiber crafts that they practice, in no particular order; and then, next to each, to list, in order of importance, why they do the crafts they do.
It seems obvious why we practice our crafts, but it isn’t. Furthermore, we may have a reason for one particular piece (weaving a sample for one of my Convergence® seminars) and another reason for another (weaving a scarf for the upcoming Guild exhibit). And our reasons change with time.
No reason is better than another and none of us should feel that any of our reasons are not legitimate. I told the group that they should go through the exercise of listing their reasons as honestly as they could, knowing that we would not share those. They are personal. But deep down inside we need to know because we won’t be able to evaluate our work truthfully if we aren’t honest with ourselves.
I speak from experience. I have known people whose wonderful pieces never seemed to please them. With more probing, I discovered that their stated reason or goal for a project (“I want to make a baby blanket for my granddaughter”) fell short of their unstated overall reason, unstated even to themselves (“I want to make pieces so incredible that Martha Stewart will feature them…”). I changed the story here, but the mismatches are equally striking.
Once you have thought about your global reason(s) for practicing a particular medium that you are about to use for a specific piece, then you are ready to plan. This is not the planning that we all do in figuring out our pattern, sett, yarn needs, etc.; that comes later. This is preplanning, as can be seen from this form.
PDF Form (it will open in a new tab): Planning a Project
The form is pretty self-explanatory, but you should think about your goal before you start, the limitations you have and the design considerations listed that are important to your project; perhaps you have others to add that you find particularly useful. One design consideration that is often overlooked is scale. I recently wrote a Right From The Start article about it (“A Question of Scale”, SS&D 184:18-22, Fall 2015). Look at the photo below of three fabrics all woven in a straight twill and the difference in the scale of the structure.

The article discusses not only the consequence of scale, but also ways to think about it, for example using software, simple arithmetic or hand drawing. They all have limitations; drawdown programs can help, but as I discussed in the article, two repeats of a pointed undulating twill with a 144 thread repeat sett at 24 ends to the inch could pose a problem for printing it all in one piece (and we should always use at least two repeats to check the transition between one repeat and the next). The article also provides information on how to manipulate scale when needed.
This pre-planning process shouldn’t take long, but it does help us focus where we are headed with that project. But don’t agonize over this! As I have said before, don’t spend more time thinking about the perfect project than it would take to do a good project. My husband Terry Dwyer says that “the perfect is the enemy of the good”. In other words, “Just Do It!” I have taken on the more eloquent mantra from The Artist’s Way by Julia Cameron, a book that I worked through a couple of decades ago and still rings true: “Dear Creator, You take care of the quality, I of the quantity.”
Here is the form for evaluating a project that we will discuss in the next blog. Meanwhile, think about why you practice the crafts you do, a goal for your next project, do the pre-planning and the planning, and then – well, “Just Do It!
PDF Form (it will open in a new tab): Evaluating a Project
Please email comments and questions to
Creativity
Marcy Petrini
2/15/2016
I am reading a fascinating book by Richard Restak, M.D., a well-known neuropsychiatrist; the book is called Think Smart, and it describes how the brain works – or at least what is known about it – and as well as what to do to prevent the decline of brain function with age.
I have gotten to the section on creativity and it has me back thinking about the topic. The book offers a number of puzzles that can only be solved by “thinking outside the box.” Elsewhere he talks about the usefulness of playing video games to exercise the brain.
Puzzles and video games are just fine for entertainment and it is great that they can help with keeping the brain sharp, but to me creativity is all about “creating” or “making”; the word is derived from the Latin word meaning to make.
While we generally associate creativity with the arts, and that is certainly true, all human endeavors require creativity. Not to say that everybody uses creativity for everything s/he does, but consider: the engineer ensuring the safety of the bridge that has to hold millions of tons over its life span; the attorney solving the riddle of the crime to free the innocent client; the architect incorporating modern conveniences while preserving an old historical building; the computer programmer writing code for an application in the most efficient way; and just recently the LIGO physicists who figured out that sound waves could be used to show the existence of the gravitational waves, first described by Einstein 100 years ago. The list goes on. They all attain creative solutions along with the music composer, the writer, the painter, the choreographer….
Which brings me to my favorite book on creativity; I have read many, from theories to the creative lives of Michelangelo and Walt Disney, but the book by dancer and choreographer Twyla Tharp, The Creative Habit. Learn It and Use It for Life, is the one than most resonates with me about how much creativity depends on hard work. There is no creativity without making and that making must be done over and over again, so that the next leap – thinking outside the box – can occur. For a nice summary, download Brian Johnson’s essay and quotes from the book. Better yet, read the book!

Next time you plan a project, think how much more able you are to come up with the perfect solution – your envisioned cloth – if you have practiced with fibers, yarns, colors and weaving structures, and whatever other elements are important to our fiber arts and crafts. I consider every piece I make a “practice” – a chance to learn about some aspect of the work I do. After all, even physicians talk about “practicing medicine.”
Practice makes perfect, but more importantly, practice leads to creativity – or as Ms. Tharp herself said: “Perfect Practice Makes Perfect.” Another example of “Just Do It!”
Please email comments and questions to