|
Pebbles! |
Marcy Petrini
October, 2025
A few years back Susan Foulkes used a pebble weave for one of her projects published in Handwoven. In skimming through the article, I vaguely remembered the pebble weave, and I decided it should be something to look up and study. I put “Pebble” on my to-do list.
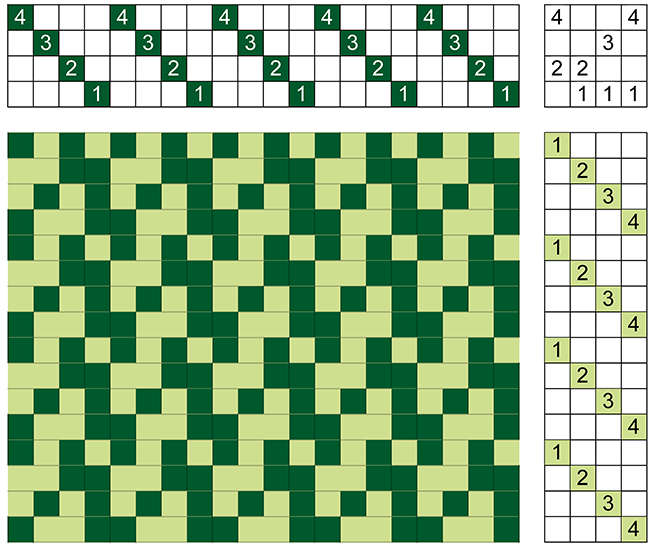
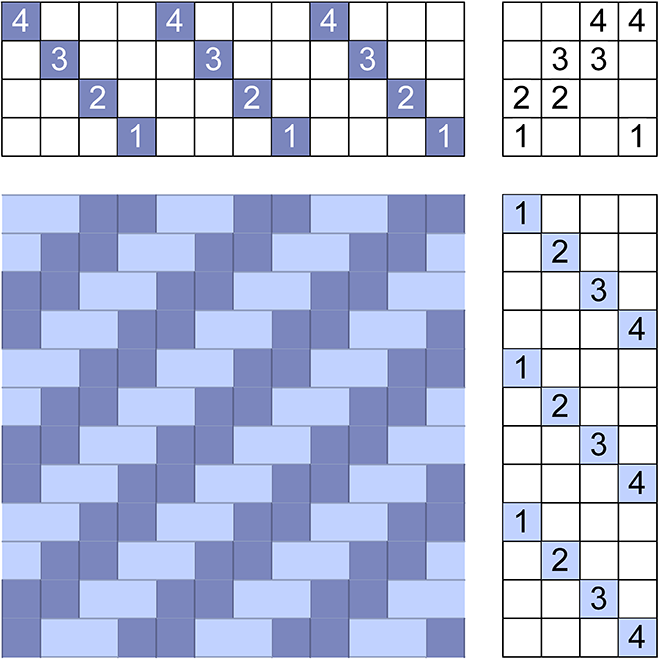
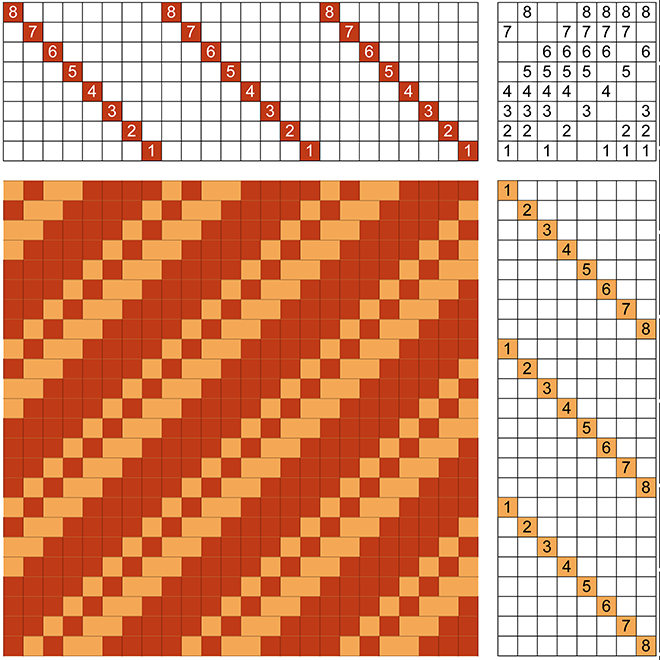
Eventually I arrived at the “pebble” entry on the list, and I looked up pebble twill in Davison’s A Handweaver’s Pattern Book. She has three treadlings shown in the drawdown below.
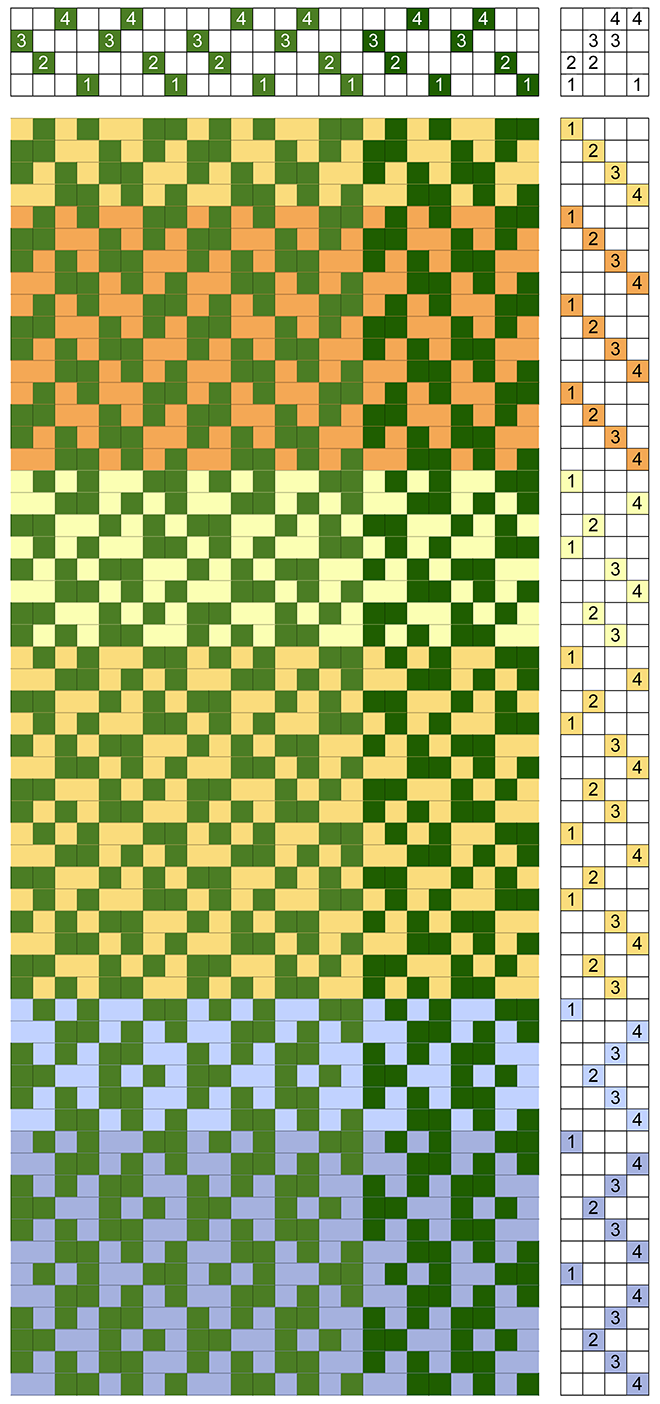
In the drawdown, the first repeat of the threading and the first repeat of each treadling are shown in a different shade to clarify them.
The pebble twill has a very clever broken twill threading; each repeat is eight threads. For the first four, we take the straight twill threading and break it by switching 3 and 4 and obtain: 1, 2, 4, 3, a common way to break a twill. For the second four threads, we take the straight twill threading and move shaft 4 before 2, 3 which results in: 1, 4, 2, 3, not as common, but another way to break a twill.
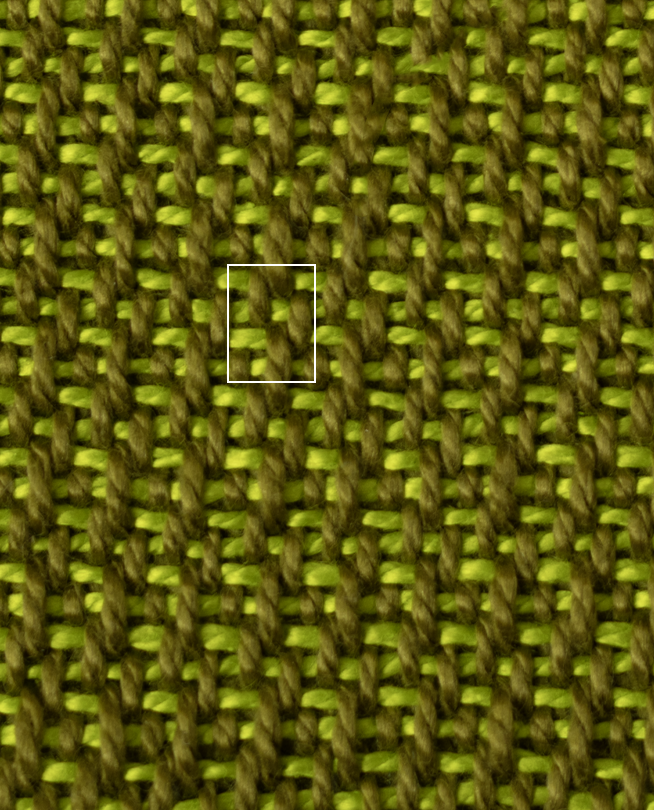
Below is fabric sample for the first treadling. A single repeat in the sample is marked by a square to highlight it, since it is really hard to detect it.
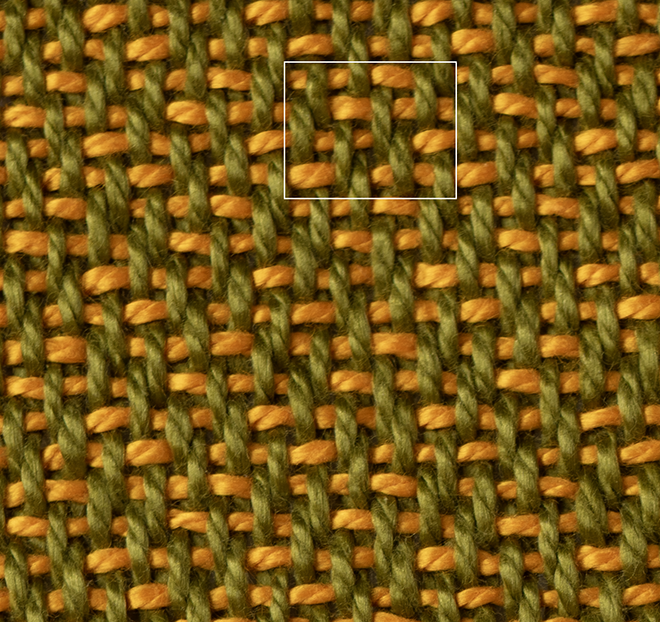
This is what I like about this twill: the repeat cannot be determined easily because the seemingly randomness causes the eye to jump around and the light to reflect in different directions. This is more effective and more interesting than the usual broken twill (see the Pictionary entry for Broken Twill.).
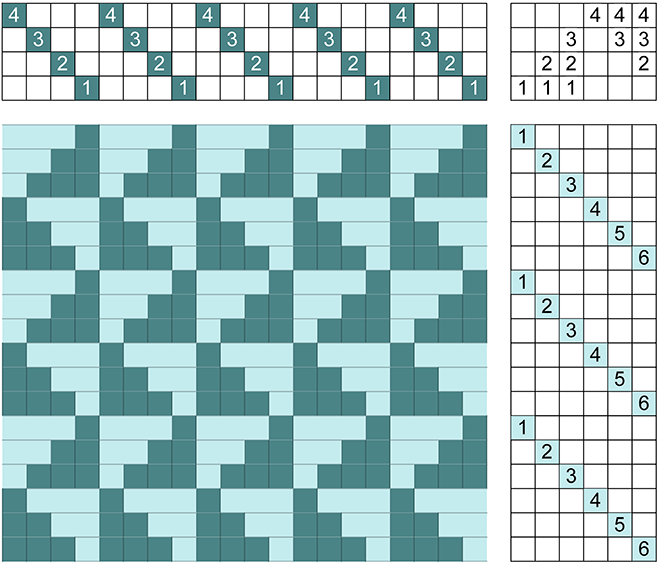
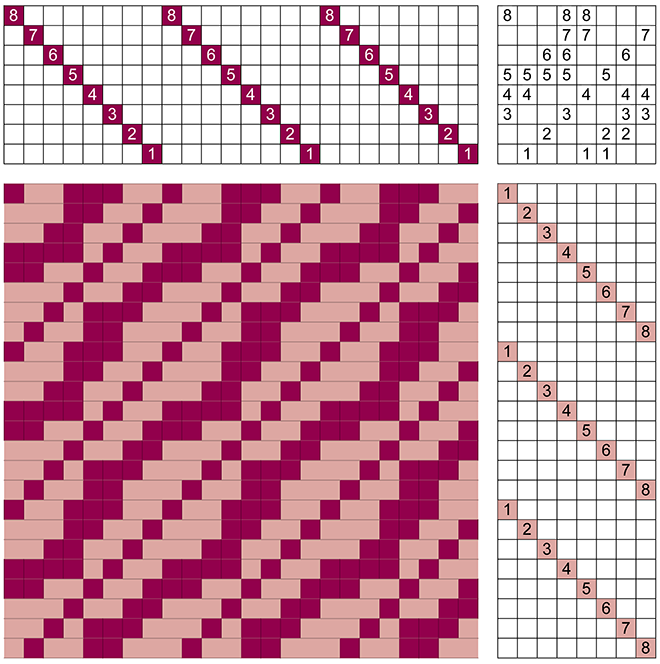
Below are the other two treadlings that are found in Davison’s book, also shown in the drawdown.
Interesting variations but not as easy to weave unless we re-tie the treadles.
At some point, I realized that Susan Foulkes had called her pattern “pebble weave”, but I just thought they were two names for the same structure as often happens in weaving.
However, this is not the case. The pebble weave is, indeed, a twill by Emery classification, but not the same twill as the “pebble twill.” We usually don’t refer to a single twill as a weave, but it’s not unusual and in this case it may help differentiate between the two.
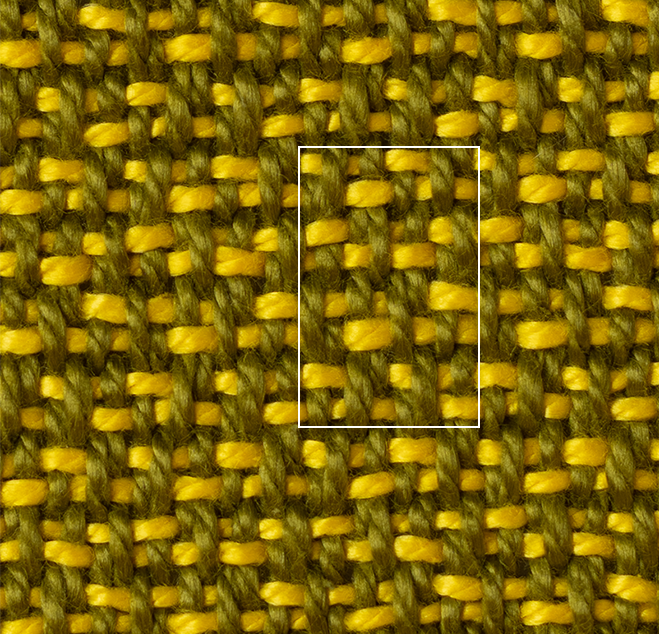
Below is the drawdown of the pebble weave. It is a straight threading with a treadling that uses the plain weave picks and two of the traditional picks from the straight draw: 1 & 2 and 1 & 4. This combination also results in a broken twill.
Below is the fabric sample, with the square highlighting one repeat of the twill. Davison has another treadling for the pebble weave, similar to the crepe weave (also a twill), using pairs of opposite treadles in the tie-up (See the Crepe Weave Pictionary entry).
The dots that appear in the fabrics may be giving the two twills their pebble names, more obvious in the drawdown than the fabric, and actually, more obvious in the pebble weave than in the pebble twill.
Lots of ways to break a twill and make a fabric with good drape but not an obvious motif.
Happy weaving!
Marcy
|
Red and Green |
Marcy Petrini
September, 2025
In the June 2025 blog I described the opponent color wheel, as shown below again:
This results from the way our visual system perceives colors:
Red ↔ Green Spectrum
Blue ↔ Yellow Spectrum
Light ↔ Dark Continuum
In the July 2025 blog, I showed a plain weave fabric with the two opponent colors, red and green, which became dull from the optical blending.
However, opponent colors do not always look dull toogether. Our visual system responds to the circumstances in which it sees colors.
First, our brain detects a shape, then it fills it with color.
If the brain can’t detect the contour of the shape – the individual threads or motifs – the colors will blend. In July 2025 we saw that blending can result in pleasing combinations or in dull fabrics, depending on the colors.
If the contour of the shape can be detected, then the brain looks at the colors while our eyes jerk from spot to spot, called a saccade. If the colors happen to be opponent, for example red and green the fabric will be shimmering.
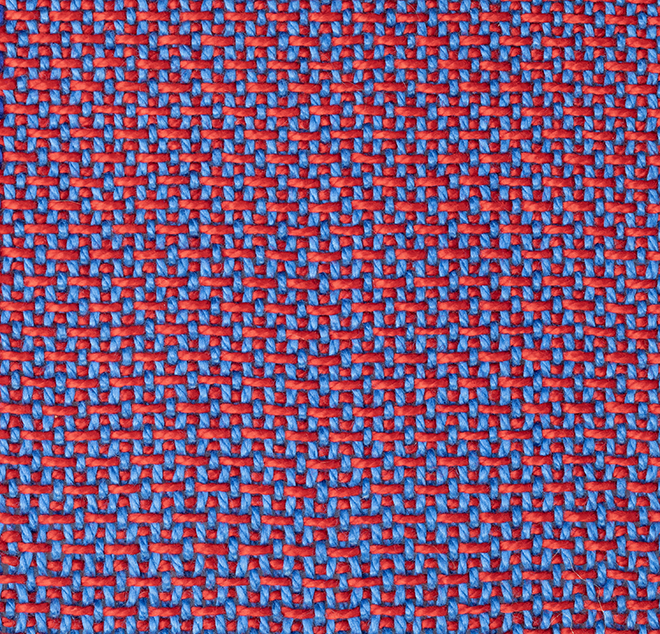
Compare the next two samples: the first is the one from the July 2025 blog: red warp with green weft in plain weave, resulting in a rather dull optical blending.
The second sample is also a red warp and a green weft but woven with a twill. There are enough treads together to provide a good saccade: the fabric shimmers.
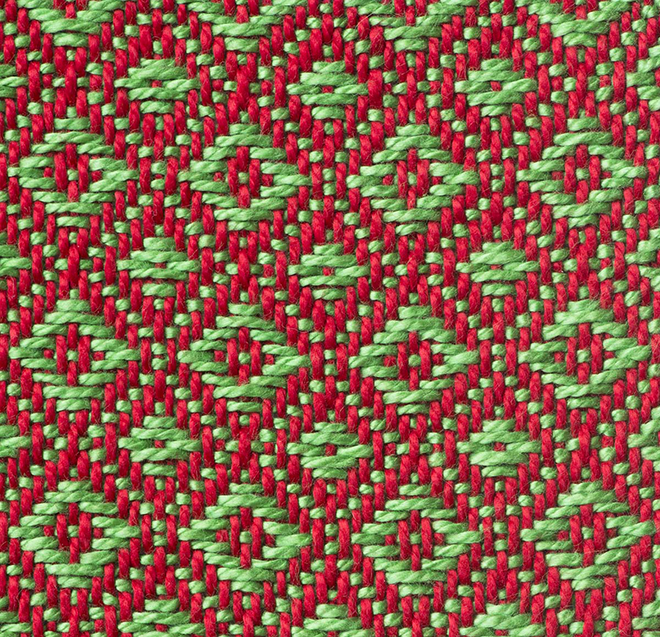
An even more shimmering fabric results from the sample below which was woven with a red ground warp, a green supplementary warp and a red weft, same as the warp.
The large areas of green on top of the red makes the blocks seem to float.
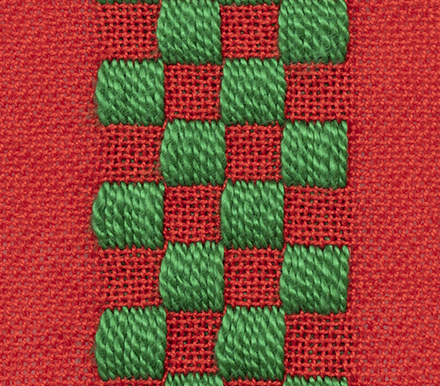
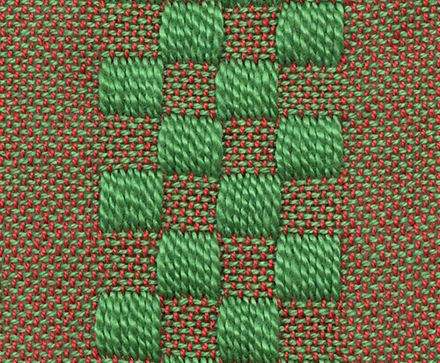
In contrast, below is a sample using the same red warp and green supplementary warp; the weft, however, is green, the same as the supplementary wasp.
There are a two visual effects here. One is the optical blending of the red and green plain weave, resulting in a dull fabric as we saw in the first example.
However, it is hard to believe that the supplementary warp in the sample below is the same as that of the sample above! The contour detection between the optical blended background and the green blocks is blunted, so the saccade doesn’t result in a vibrant outcome. The block edges are less clear and the green is not shimmering.
Understanding these opponent colors allows us to manipulate our yarns for our projects. A holiday runner in red and green? Try a bold twill or blocks, but no plain weave in red and green.
Happy weaving!
Marcy
|
Balanced or Unbalanced? |
Marcy Petrini
August, 2025
These terms can be confusing since they sound almost as if they could describe the same fabric. Also, they have been used under different circumstances.
I use balanced to describe a fabric where there is the same amount of warp and weft on both sides of the cloth. The motifs may be different, but it’s the amount of yarn that is balanced. In contrast, an unbalanced fabric is weft-dominant on one side and warp-dominant on the other.
Below is a photo of a balanced fabric, huck lace.
The lace portions have equal amounts of warp and weft floats on both sides of this shawl, and the plain weave stripes also have the same amount of warp and weft on each side. In contrast, the fabric below is unbalanced. The first photo shows one side, followed by a photo of the other side.

The fabric is a sample of a three-shaft twill. By necessity, structures with an uneven number of shafts produce unbalanced fabrics; satins on five shafts is another example. However, we can have an unbalanced structure with an even number of shafts. A 3/1 broken twill, also called a false satin, uses four shafts and produces an unbalanced fabric as shown below.
The terms regular and irregular generally refer to twills. A regular twill is one that can be described by a ratio which tells us the number of warps ends that are raised and the number that are lowered (or vice versa) with every pick. If there isn’t a single ratio to describe the treadling of the motif repeat, the twill is irregular.
This is clearer using drawdowns. Below is the quintessential regular twill, a 2/2 straight will. For every pick, 2 threads are up and two are down to be covered by weft.
The drawdown below is described by Davison as a basket weave variation (although it is a twill and not a basket weave structure). A pick may raise one, two or three shafts. There is no way to describe the ratio as it changes with every pick of the six-thread treadling steps.
Both this straight twill and the basket weave variation are balanced fabrics. Even though with every pick the basket weave variation seems to be unbalanced, it is the overall fabric that is balanced, it has the same amount of warp and weft on each side of the fabric.
However, both regular and irregular twills can be unbalanced.
The drawdown below is a 4/2/1/1 twill; this means that with every pick, five threads (4+1) are up and 3 (2+1) are down, thus producing an unbalanced fabric. The twill is regular, but the fabric is unbalanced.
The undulating twill below is irregular because there is no single ratio that describes all eight treadling steps. This will produce an unbalanced cloth as we can see from the drawdown: on this side of the fabric there is more weft than warp, the other side will be the opposite.
Why does it matter if a fabric is balanced or unbalanced? Unbalanced fabrics tend to pack more weft, so they can be heavier and less drapeable. By adjusting the thread size, we can avoid it, but we have to plan ahead.
Whether a twill is regular or irregular only matters in the describing it. If I wrote about the regular unbalanced twill above, all I would have to say is that the twill is a 4/2/1/1 woven on a straight draw. To describe the undulating twill we just saw, however, the entire drawdown is necessary.
Happy Weaving!
Marcy
|
Resolution: |
Marcy Petrini
July, 2025
I had a fabulous time in Albuquerque teaching at the Intermountain Weavers Conference. The conference was so well organized, it is hard to believe that it was all volunteer work. I taught about color, both as a seminar and as part of designing twills. And I am still thinking about the interactions of various colors. One of the things that we need to consider when dealing with these color interactions is resolution.
For our purposes, resolution is how fine of a detail we can detect, for example how small a motif we can perceive.
The further away we are from any motif, the harder it is to distinguish it. Similarly, at the same distance, a larger motif may be detected, while a smaller one cannot.
Look at the scarf in the photo below. It is woven with a blue warp, as can be easily seen, and a variegated weft of blues, golds, and rusts.

When we look at the entire scarf, we see stripes that change colors and move our eyes along the fabric, especially where the light hits the scarf.
If we look closer, as in the photo below, we see distinct small stripes, which appear to have some texture.

Closer still, we see that the stripes alternate between background and a raised motif.

Zooming in shows us that the stripes are formed not only by the yarn colors, but also by the structure. It is a pointed twill threading, woven with alternating treadling steps of a motif forming crosses, and plain weave. Thus, the colors stand out in the motifs and recede in the plain weave background, giving the fabric a three-dimensional appearance, which helps reflect the light.

A final zooming in, shows the individual threads. The floats in the motif are visible, as well as the background plain weave.

This is how changing distance changes resolution and what fine details we can see.
Why should we care about resolution? Two things, really: optical blending and planning for distance viewing.
When our visual system fails to resolve colors or motifs, optical blending results. This can be good or bad, depending on the colors used or the outcome we wish.
The fabric in the picture below has a warp half green and the other half yellow. The same two colors are used for weft. We can see that where the yellow and green intersect with plain weave, a yellow-green fabric results. If we were looking just at the yellow and green sections, we wouldn’t know that the yarns weren’t yellow-green. The optical blending gives us a new color in the fabric.

Optical blending, however, can also result in lifeless fabrics. This can occur in particular with colors on the opposite side of the opponent spectra (see June 2025 blog for the description of the opponent system):
Red ↔ Green Spectrum
Blue ↔ Yellow Spectrum
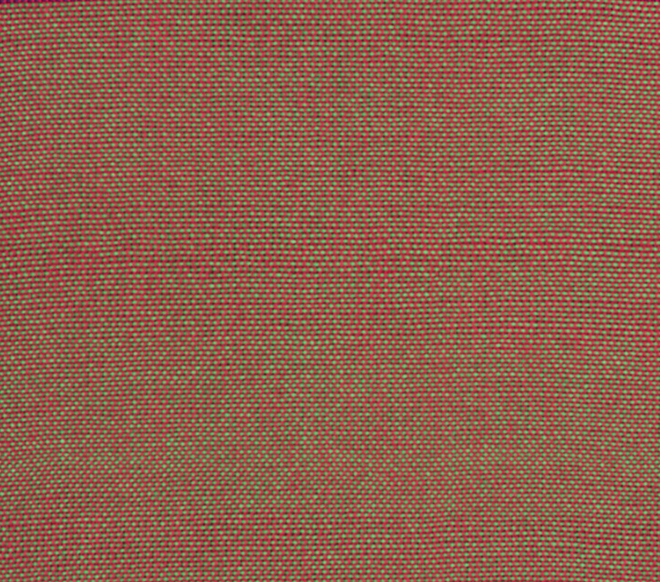
Below is a close up of a plain weave fabric woven with a red warp and a green weft. The opponent colors become browned out; since there is poor resolution at this distance, optical blending results. Choosing a weft that is not the opponent color would have prevented this. As we described in the June blog, we can determine the true opponent of any color by doing an after image.

The second reason to care about resolution is that we want to plan our fabrics for the distance at which they will be viewed. For instance, a scarf will be viewed at an arm’s length, unless it is displayed at an exhibit. A tablemat will be viewed closely if placed on a table when eating.
Planning the fabric so that it will be interesting both close up and further away can be challenging. I have seen beautifully intricate fabrics close-up in exhibits only to have them become a beige blur when stepping away.
Check your fabric while still on the loom, looking at it from different angles and distances, thus changing the resolution. The scarf at the beginning of this blog shows different aspects of the fabric at different distances as we have seen. We will never see the same details at different distances, but we do want to make sure that the fabric is attractive at all the distances at which we will view it as the resolution changes.
And you thought resolution was only a feature of your new smart phone!
(Or Lent -- T.D.)
Happy Weaving!
Marcy
|
The Opponent Color Wheel |
Marcy Petrini
June, 2025
I have been thinking about color a lot lately, as I get ready to go to the Intermountain Weavers’ Conference where I will be teaching a seminar on color and a workshop on designing twills which, of course, includes color.
It’s fairly recently in my weaving journey that I have come to really understand what causes the various effects we see in our weaving and it all comes down to the way our eyes and brain are integrated to see.
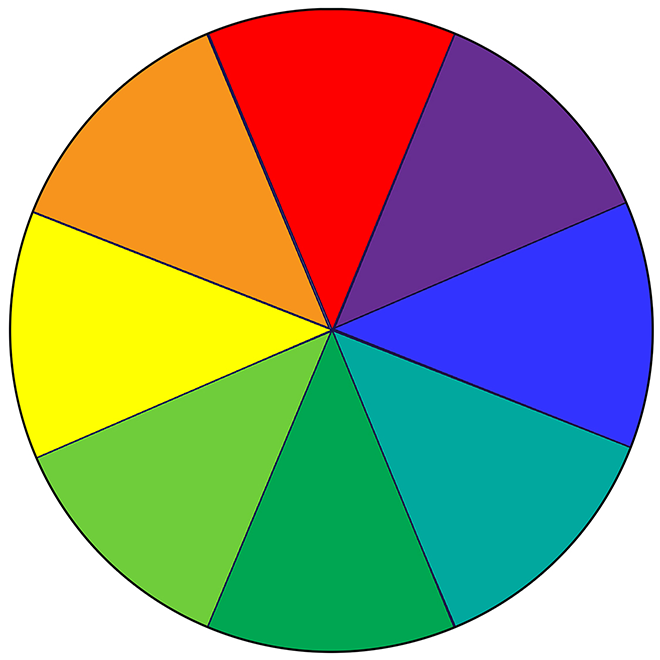
For starters, I use the opponent color wheel:

This is not the latest scientific discovery; it was Ewald Hering who described the opponent system in 1874 – no, that’s not a typo, it was 1874!
We can see all of the colors in our world from the opponent system:
Red ↔ Green
Blue ↔ Yellow
Light ↔ Dark
Our brain detects how red or green a color is, as well as how blue or yellow it is, and it sums up the output of the other two spectra to determine light through dark.
That is why there is a reddish blue -- purple -- but not reddish-green or blueish-yellow. And we see pink because, while it is a red, there is a smaller output to the light-dark continuum.
What’s remarkable about this opponent system is that, given any color, we can determine its opponent by using an after-image.
Think of another nervous system, temperature: if you put your hand in very hot water and you keep your hand there, soon the water won’t feel hot anymore because the system has gotten “tired.” That’s what happens when staring at a color for some 20 seconds, the brain gets tired, and you see the opponent color when you look away.
It does take some practice to obtain a good after-image, and we must follow directions. Here they are, using a yarn:
1. Place the yarn whose after-image you want to detect on a white surface; a sheet of paper is fine.
2. Place another sheet of paper with a black dot in the middle.
3. Stare at a single point on the yarn for 20 seconds without moving your eyes and without blinking.
4. Move your eyes to the black dot on the white sheet of paper; again, no blinking or moving your eyes. Watch the after-image evolve over several seconds.
It’s important not to move your eyes, or blink, otherwise the brain resets and no after-image can appear.
Try it! You will be surprised that the after-image of red is not always green, because the reds may have other colors. I like to use the after-image to help me decide what weft to use once I choose a warp.
Happy Weaving!
Marcy