How Well Do You Know Your Twills?
Marcy Petrini
August, 2020
When my Covid-19 quarantine started, I was some three weeks into an 8-weeks twill class I was teaching at the Mississippi Craft Center. Even after the locked down ended, the studio is way too small for social distancing. Eventually, we switched to zoom, with students either taking their warps home to weave it or going to the studio solo to finish the project.
How well did it go? I would say well, because at the end, I decided to have a final test and they did well! And next, we will zoom about lacey weaves.
Here is the beginning twill test – how well do you know your twills?
Twill Test (Choose the best answer)
>
- The minimum number of shafts needed for a twill is:
- 1
- 2
- 3
- 4
- Floats in a twill fabric are:
- Weft floats
- Warp floats
- Both warp and weft floats
- Depends on the twill
- A standard tie-up is:
- 1&2; 2&3; 3&4; 4&1; 1&3; 2&4
- 4&1; 3&4; 2&3;1&2; 2&4; 1&3
- 1&3; 1&2; 2&3; 3&4; 4&1; 2&4
- All of the above
- In an unbalanced twill:
- The fabric is warp-dominant
- The fabric is weft-dominant
- The fabric depends on the specific twill
- The fabric is warp-dominant on one side, weft-dominant on the other
- Which cannot be woven on 4 shafts:
- Satin
- False-satin
- Broken twill
- Extended pointed twill
- Which are possible weaving combinations?
- Straight twill threading, pointed twill treadling
- Pointed twill threading, straight twill treadling
- Undulating threading, broken twill treadling
- All of the above
- A fancy twill is:
- An unbalanced twill
- An irregular twill
- A treadling method
- A twill with plain weave
- Waffle weave is
- A treadling method
- Pointed twill
- Bird’s eye twill
- Popcorn weave
- If the treadling step is 1&3, which is the “on opposite” treadling step?
- 1&2
- 2&4
- 2&3
- 3&4
- Floating selvages:
- Should be used on the side where the weft doesn’t catch
- Should be used on both sides of the fabric
- Are not needed for twills
- Are needed for irregular twills
- For a balanced fabric, the sett for a twill should be:
- About the same as for plain weave
- Slightly more open than a plain weave
- Slightly denser than for plain weave
- Depends on the twill
- For a weft faced twill, which of the following are true:
- The weft covers the warp
- The color interactions provide the pattern
- A number of different twills can be used
- All of the above
- If the number of threads needed for a project (width times sett) doesn’t match the twill repeat:
- Arriving at the match depends on the twill
- The number of repeats have to be increased
- The number of repeats have to be decreased
- Balancing threads have to be added
- Which weft would show a bird’s eye twill best on a variegated warp of blue, green and purple?
- Blue
- Green
- Depends on the weft shade
- Variegated blue, green and purple
- To weave a 1/3 and 3/1 straight twill on the same side of the fabric with 6 treadles, which combination will work?
- 1, 2, 3, 4, 1&3, 2&4
- 1&2, 2&3, 3&4, 4&1, 1&3, 2&4
- 1, 2, 3, 4, 1&2&3, 2&3&4
- None of the above
Answers coming up soon… next month, which is only a couple of weeks away!
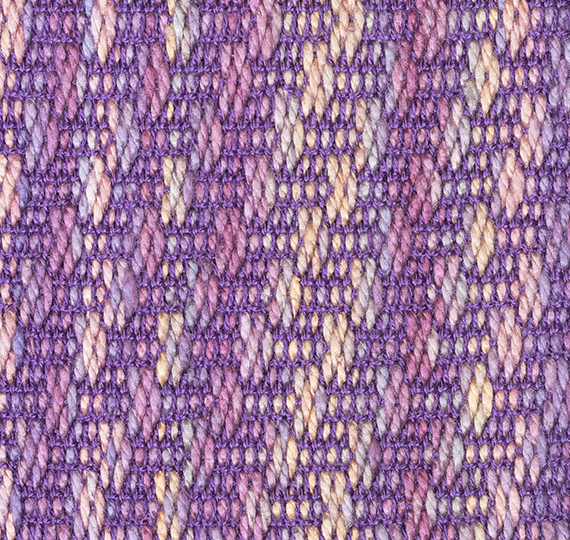
Meanwhile here is a fun corkscrew twill scarf!

Happy weaving and stay safe and healthy!
Please email comments and questions to
Treadling: A Tale of Two Meanings
Marcy Petrini
Jujy, 2020
The word “treadling” is used in one of two ways, which, unfortunately can cause a lot of confusion. These are the definitions:
- Given a threading, treadling is the sequence of shafts activated (either raised or lowered depending on the loom) which produces the desired pattern or motif.
- Treadling is the order in which treadles, tied to a specific tie-up, are used.
These two sound the same, but they aren’t. The treadling-as-a-sequence-of-shafts is independent of loom, meaning that if I give you that sequence, you can weave that pattern. Even if we switch raising and lowering shafts, the same fabric is produced, with the top and bottom on the loom reversed.
The second without its tie-up is ambiguous. And the treadling-as-the-order-of-treadles is meaningless for someone who weaves with a direct tie-up, for example a table loom, or with a dobby.
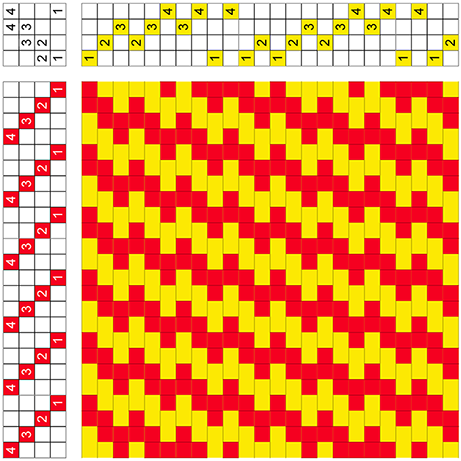
So, be cautions of your use. Several years back, a beginning student relocated, bought a table loom, and joined a guild in her new location. After having woven a few plain weave items, she decided to try a pattern. She asked a guild member what would be the next best thing. “A straight twill, said the guild mate, you thread it as in plain weave, 1, 2, 3, 4, and you also treadle it 1, 2, 3, 4.” And showed her a fabric like this:

My former student went home and wove this:

She used the drawdown below. She understood the treadling-as-a-sequence-of-shafts to be 1, 2, 3, 4.

Given that she had no other information, that’s a reasonable thing to conclude. What the guild mate meant, however, was treadling-as-the-order-of-treadles, shown below, which is generally for a floor loom.

Furthermore, the guild mate assumed a “standard” tie-up, but that, too is confusing. The “standard” tie up on 4 shafts is all the possible combinations of shafts activated two at a time. There are 6 possible combinations. All of the tie-ups below would be considered “standard”, yet, for any treadling-as-a-sequence-of-shafts to produce a given pattern, each of these tie-ups would have different treadlings-as-the-order-of-treadles. How one ties those treadles to shafts at any given time and loom is a matter of preference and weave structure:
 |
 |
 |
 |
Back to my weaving student. If asked what is the treadling for the fabric my student wove, I would say:
| 1 |
| 2 |
| 3 |
| 4 |
| Repeat |
For the treadling of the fabric she wanted to weave I would say:
| 1 & 2 |
| 2 & 3 |
| 3 & 4 |
| 4 & 1 |
| Repeat |
Now my student could go to her table loom and weave it this way:

This drawdown is identical to the previous one with a 2/2 tie-up. My directions would be unambiguous.
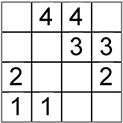
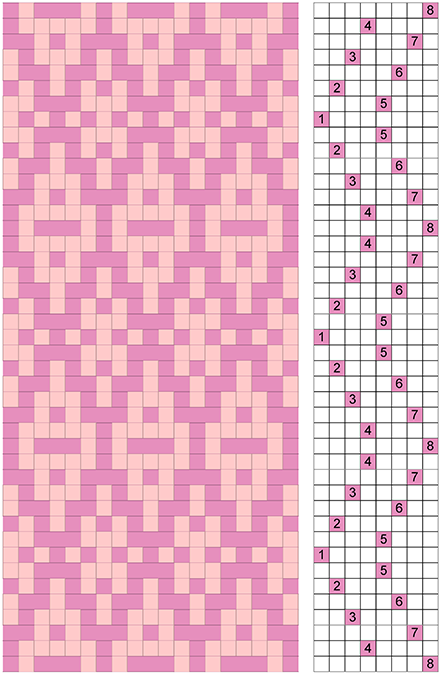
Now let’s consider another common use. I am weaving a set of placemats, using a pointed twill; for each one, I will change the treadling without changing the tie-up, the tie-up without changing the treadling, and changing both the tie-up and treadling.
Here is my original pointed twill, tromp as writ:

Here are the treadlings:
|
as the order of treadles |
as a sequence of shafts |
|
| 1 | 1 & 2 | |
| 2 | 2 & 3 | |
| 3 | 3 & 4 | |
| 4 | 4 & 1 | |
| 3 | 3 & 4 | |
| 2 | 2 & 3 | |
| Repeat | Repeat |
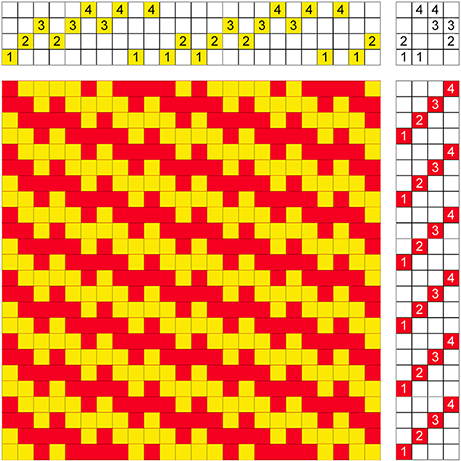
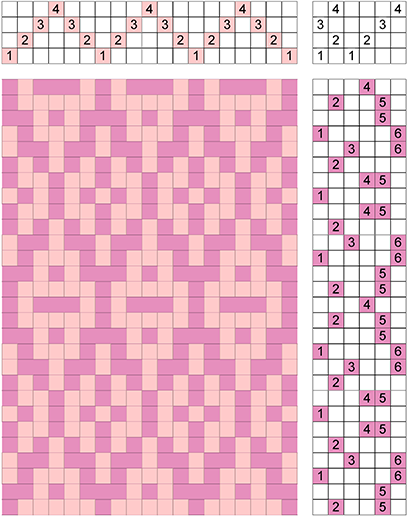
For my next placemat, I am going to change the treadling to bird’s eye:

Here are the treadlings:
|
as the order of treadles |
as a sequence of shafts | |
| 1 | 1 & 2 | |
| 2 | 2 & 3 | |
| 3 | 3 & 4 | |
| 4 | 4 & 1 | |
| 1 | 1 & 2 | |
| 4 | 4 & 1 | |
| 3 | 3 & 4 | |
| 2 | 2 & 3 | |
| Repeat | Repeat |
Compare this drawdown with the previous one. The patterns are different as you would expect.
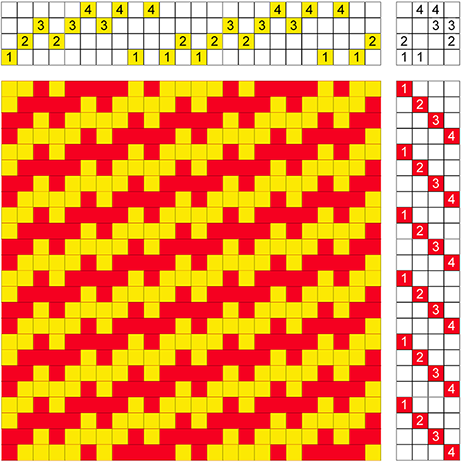
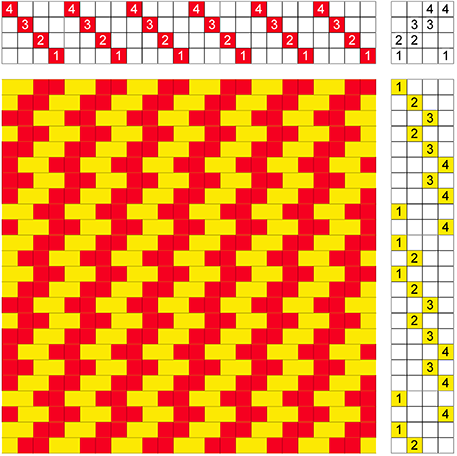
Now I am going to change the tie-up but use the same treadling as the original pointed twill:

The drawdown is different than the tramp as writ, because, even though the treadling-as-the-order-of-treadles hasn’t changed, the treadling-as-a-sequence-of-shafts has:
Treadling-as-the-order-of-treadles
| Original | New Tie-Up | |
| 1 | 1 | |
| 2 | 2 | |
| 3 | 3 | |
| 4 | 4 | |
| 3 | 3 | |
| 2 | 2 | |
| Repeat | Repeat |
Treadling-as-a-sequence-of-shafts
| Original | New Tie-Up | |
| 1 & 2 | 1 & 2 | |
| 2 & 3 | 3 & 4 | |
| 3 & 4 | 1 & 3 | |
| 4 & 1 | 2 & 4 | |
| 3 & 4 | 1 & 3 | |
| 2 & 3 | 3 & 4 | |
| Repeat | Repeat |
So, when you use that terminology, saying that you changed the tie-up without changing the treadling, make sure that you – and your audience – understand that you are in fact changing the treadling-as-a-sequence-of-shafts, or the pattern wouldn’t change. And users may need the treadling-as-a-sequence-of-shafts because different weavers prefer different tie-ups, and some don’t use tie-ups at all.
If we change the tie-up and the treadling from the original pointed twill, we will change the pattern as expected:

The treadling-as-a-sequence-of-shafts now is below, even though the treadling-as-the-order-of-treadles has not changed from the bird’s eye treadling:
|
as the order of treadles |
as a sequence of shafts | |
| 1 | 1 & 2 | |
| 2 | 3 & 4 | |
| 3 | 1 & 3 | |
| 4 | 2 & 4 | |
| 1 | 1 & 2 | |
| 4 | 2 & 4 | |
| 3 | 1 & 3 | |
| 2 | 3 & 4 | |
| Repeat | Repeat |
Here is another example where both the tie-up and the treadling were changed:

And we expect the drawdown to change… but it doesn’t!
| |
|
That’s because the treadling-as-a-sequence-of-shafts hasn’t changed, it’s still:
| as a sequence of shafts |
| 1 & 2 |
| 2 & 3 |
| 3 & 4 |
| 4 & 1 |
| 3 & 4 |
| 2 & 3 |
| Repeat |
When I weave a pointed twill that has 6 steps in the treadling-as-the-order-of-treadles, I prefer my order of treadles to be straight, it makes my weaving faster than having to go back and forth with the conventional tie-up.
Next time you talk about a treadling, make sure that you are clear which use you mean - treadling-as-the-order-of-treadles or treadling-as-a-sequence-of-shafts – and if you hear someone talk about a treadling, determine which use of treadling is being discussed, and, if in doubt, ask.
Happy treadling!
Happy Weaving!
Please email comments and questions to
Turning a Draft - II
Marcy Petrini
June, 2020
In the May blog we learned out to turn a draft by using an 8-shaft, 4 treadle draft; our turned draft had 4 shafts and 8 treadles, which we reduced to 6 by combining treadles weaving with two feet, since most 4 shaft looms have 6 treadles.
Reducing the number of shafts is just one reason to turn a draft; at the end of the May blog there was a challenge: 3 drafts to turn. The first is to simplify the treadling, the second is to change the structure from a two-shuttle weave to one. The third challenge is a draft on more than 4. All of these result in fabrics with a rotated pattern, which is another reason to turn a draft.
Here is a summary of the steps to turn a draft, which we used last month, and we will use on the 3 challenge drafts:
- Choose a draft with a complete repeat in both threading and treadling; two repeats of each will clarify what happens at the junction of repeats
- Rotate the draft; the treadling becomes the threading and the threading becomes the treadling
- Change the shaft, treadle and treadling step numbers to positions
- The treadling will be on the left side; slide it to the right side, to keep with the convention
- The tie-up is also on the left side; slide it to the right side, above the treadling
- Transpose the tie-up so that all empty positions are filled, and all filled positions are empty
- Change positions back to numbers
- Do the drawdown; it should be identical to the original but rotated.
| ⇐ Threading | Tie - up |
| Drawdown |
T |
Challenge 1: Turning the Draft to Simplify the Treadling
Below is a twill threaded pointed and treadled advancing. When I weave, I like to concentrate on my beat and selvages; thus I prefer a simpler treadling. When I thread, I have to think about only the threading, so a more complicated pattern is acceptable.

Click here for a draft that you can resize as needed
(a PDF will open a new window or in your list of downloaded files)

If I turn it this draft, I will have an advancing threading and a straight treadling:
Here is the draft rotated:
Next, we change the numbers to positions; note that the threading is not symmetrical, as the one in the example from the May blog:

We have our threading by numbering our shafts:

We slide the treadling to the right side and number the treadling steps:
 |
 |
Finally, we transpose the tie-up and then number the shafts attached to each treadle:
 |
 |
And here is our turned draft:
Click here for a draft that you can resize as needed
(a PDF will open a new window or in your list of downloaded files)
Below are the various combinations of starting the threading and the treadling from different positions. Some software that has the option of turning drafts uses algorithms that may return one of these options.
The advancing threading starting on the right reverses the direction of the twill on the loom:

Click here for a draft that you can resize as needed
(a PDF will open a new window or in your list of downloaded files)
Reversing of the direction of the twill also occurs if we keep the original threading but treadle starting on the left, 1, 2, 3, 4, rather than 4, 3, 2, 1, with the same tie-up.
Click here for a draft that you can resize as needed
(a PDF will open a new window or in your list of downloaded files)
If we combine these two options – starting the threading on the right and the treadling on the left, we have the original turned drawdown. I would find this option easier to weave.
Click here for a draft that you can resize as needed
(a PDF will open a new window or in your list of downloaded files)
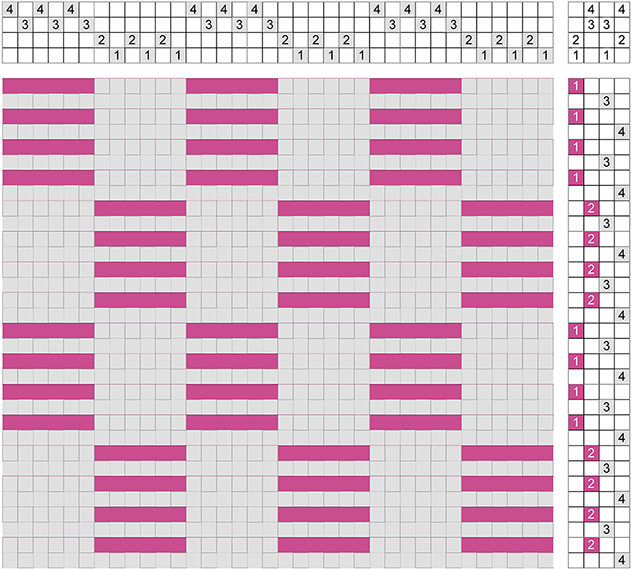
Challenge 2: Turning the Draft to Change a Two-shuttle Weave to a One-shuttle Weave
Many two-shuttle weaves have a complimentary weft and a ground weft that a weaves a plain weave background with the warp of the same size. This usually means 6 treadles, 2 for the ground, 4 for the pattern weft; in turning such a draft, there will be a threading with more than 4 shafts. Changing from two to one shuttle is used most with multi-shaft weaving.
Monk’s Belt, however, is a supplementary weft weave on 4 shafts, with 2 blocks and 4 treadles, so it can be turned on 4 shafts.
Below is the drawdown of Monk’s Belt; the grey warp and ground weft form plain weave in one block, while the other is covered with weft floats. The purple pattern weft weaves the two blocks. Thus there is one warp and two wefts.
Click here for a draft that you can resize as needed
(a PDF will open a new window or in your list of downloaded files)
To turn the draft, we use the same method as shown in the sections above. Our end result will be two warps and one weft.
Here is the draft rotated with the numbers replaced by positions:

Then our threading is as rotated, the treadling slides to the right and the tie up slides to the right and is transposed; finally, positions are replaced by numbers and we can perform the drawdown, which is exactly like the original drawdown rotated:

Click here for a draft that you can resize as needed
(a PDF will open a new window or in your list of downloaded files)
And here is the fabric.
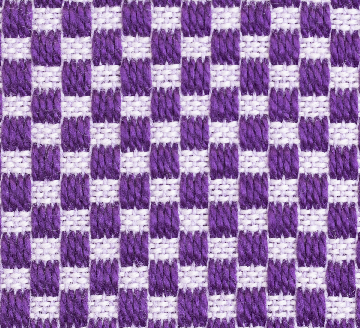
When I weave a supplementary weft weave, as Monk’s Belt, I set the warp for the ground tabby, but slightly more open. The same is true for a turned draft, which is, in fact, a supplementary warp weave. Barbara Walker, in her book Supplementary Warp Patterning says that the sett for a supplementary warp weave should be that of the ground warp, slightly more open to accommodate the supplementary warp.
In the sample above, the background warp and weft are 10/2 mercerized cotton. I set the warp at 18 epi which is the lower end of the tabby range. If I were using that yarn for plain weave without the supplementary warp, I would set it at 22 or 24, depending on the final use of the project.
Turning the draft this way can be used so that the supplementary warp forms stripes just in part of the cloth.
Challenge 3: Turning the Drafts with More Shafts
The process of turning a draft is the same, regardless of the original number of shafts.
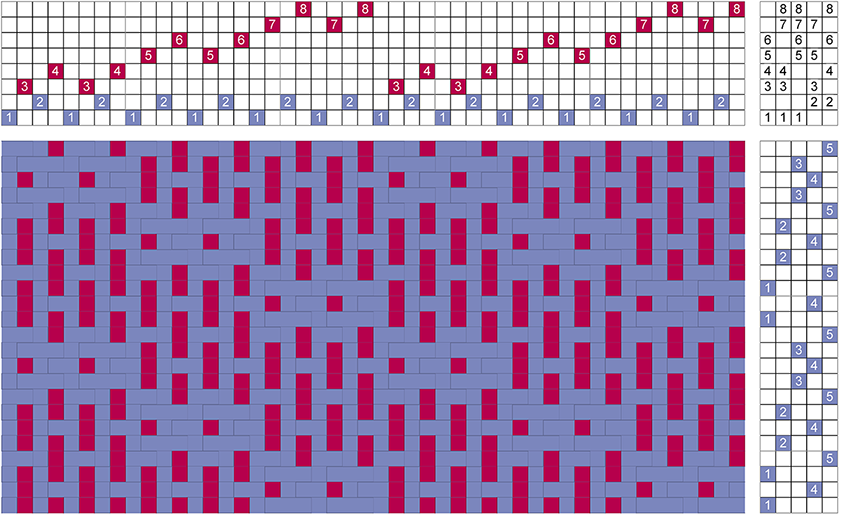
Below is a draft of a summer and winter on 5 shafts, 3 blocks, treadled “singles” (each pattern shaft is followed by the same tabby shot), each block individually (meaning not combined). There are two repeats in the threading and two in the treadling. Since it has 8 treadles, the turned draft will require 8 shafts. In the draft below, the warp and background weft which form the tabby are in blue, the pattern weft in dark red.

Click here for a draft that you can resize as needed
(a PDF will open a new window or in your list of downloaded files)
Below is the draft rotated, with numbers replaced by positions:

The treadling becomes the threading which has two warps, a background in blue and a pattern in dark red. The threading becomes the treadling and is moved over to the right. The tie-up is moved over to the right and transposed. Numbers replace the positions.
And the final draft:
Click here for a draft that you can resize as needed
(a PDF will open a new window or in your list of downloaded files)
Here is a close up of the fabric. As in turned Monk’s Belt, the sett of the warp is that of the ground, slightly more open than the usually tabby to accommodate the supplementary warp.
This is one method of turning drafts, probably the most common. I learned it when I was a fairly beginning weaver from Berta Frey’s book, Designing and Drafting for Handweavers. The terminology “transposing the tie-up” comes from her book (I did find an error in her tie-up in that section). Since then it has been discussed in other publications as well.
Some drawdown software offers the possibility of turning drafts by using algorithms that are not always applicable to all drafts. The method that I have described here, however, works with all kinds of structures.
Below is the full piece whose sample is above, which I wove from with the turned summer and winter draft we just discussed. It was supposed to be a sample, but I loved the colors, so I kept on weaving. It is too heavy for a scarf; it’s silk and narrow, so not appropriate for a table runner. I guess it’s going to be a wall hanging!

Happy Weaving!
Please email comments and questions to
Turning a Draft
Marcy Petrini
May, 2020
To turn a draft means exactly what the name implies: the draft is rotated on its side so that the threading becomes the treadling and the treadling becomes the threading. The tie-up is transposed as we shall see.
There are several reasons to turn a draft: 1) to reduce the number of shafts needed for a pattern; 2) to simplify the treadling; and 3) to change a two shuttle weave to one shuttle weave. In the process, the pattern is rotated as well, which can be another reason to turn the draft.
The process works for any structure, whether we are familiar with it or not, and any number of shafts. If a structure is a 4-shaft weave, when turned, it will have four treadling steps. But if the pattern requires 6 treadles to weave, 6 shafts are needed. The converse is also true: for a structure with more shafts but 4 treadles, the draft will convert to 4 shafts.
In order to be consistent, we will follow the following convention for drafting:
| ⇐ Threading | Tie - up |
| Drawdown |
T |
In this blog, we will go through the process of turning a draft step by step using an example from the first option, reducing the number of shafts needed. At the end there are 3 drafts for you to try to turn. We will discuss the turned drafts for these examples in the next blog.
Turning the Draft to Reduce the Number of Shafts
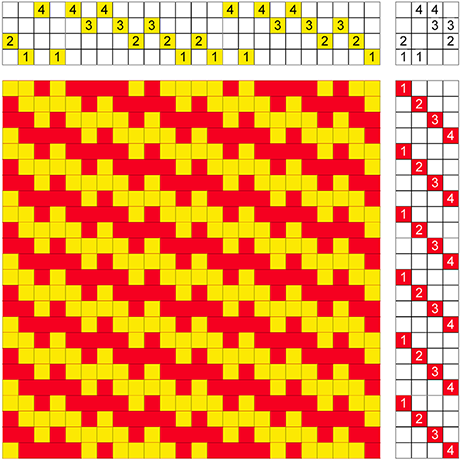
Below is an interlocked twill threaded on 8 shafts and woven with 4 treadle. There aren’t too many of these combinations – 8 shafts and 4 treadles – but they do exist; there are also patterns on 6 shafts that can be turned to 4.

Click here for a draft that you can resize as needed (a PDF will open a new window or in your list of downloaded files)
When I turn a draft, I find it easier to think of the threading, tie-up and treadling as position in the draft, without numbers, as below:


When we rotate it, the treadling becomes the threading, but the treadling and tie-up are on the wrong side:

From the rotated draft, we build the turned draft one section at the time by changing the position to numbers of shafts, treadles and treadling steps. The threading is particularly easy because it’s symmetrical. The original treadling rotated:

It becomes the threading of the turned draft:

The treadling is on the wrong side for our convention, so we slide over:

The treadling of the turned draft becomes:
We could slide the tie-up along with the treadling. Below we have the rotated treadling and tie-up on the left, the turned treadling and tie-up on the right.
 |
 |
However, if we do the drawdown according to those directions, the result below doesn’t look like our original draft rotated!

If we look carefully, however, we see that it is the other side of the fabric. We could just weave it that way and turn the fabric at the end. Or we could change the tie-up the way we do when we change a tie-up for a sinking shed loom to a rising shed loom, or vice versa: we tie what is not tied and untie what is tied, called transposed.
On the left is the tie-up above again, to the right, the tie-up transposed:
 |
 |
And here is the turned drawdown; it does look like the rotated draft:

Click here for a draft that you can resize as needed (a PDF will open a new window or in your list of downloaded files)
Most 4-shaft looms do not have 8 treadles, but the tie-up can be re-arranged so the treadling can be done with two feet as shown in the drawdown below (2 repeats):
Click here for a draft that you can resize as needed (a PDF will open a new window or in your list of downloaded files)
While the treadling is a bit cumbersome, it can be woven on 4 shafts.
A Challenge
Here are 3 drafts that you can turn. Try them! Next blog we will review the process while turning them.
Twill Treadled Advancing
Click here for a draft that you can resize as needed (a PDF will open a new window or in your list of downloaded files)

Monk's Belt
Click here for a draft that you can resize as needed (a PDF will open a new window or in your list of downloaded files)

Summer & Winter Singles With Tabby
Click here for a draft that you can resize as needed (a PDF will open a new window or in your list of downloaded files)
Happy Weaving!
Please email comments and questions to
Honeycomb
Marcy Petrini
April, 2020
I learned about honeycomb when I took a class that included overshot. Mary Black in New Key to Weaving describes it as “one that can be treadled on many overshot drafts.” Thus honeycomb is a treadling method.
As overshot, honeycomb uses one warp, generally threaded in an overshot pattern, and two wefts. In overshot, the heavy thread forms the floats of the block and the lighter thread, usually the same size as the warp, forms the background cloth. But in honeycomb, the body of the block is woven with the same size thread as the warp and a heavier thread outlines the blocks, forming the lattice that resembles a honeycomb from which the weave gets its name.
Because it had been a long time since I had woven honeycomb, I decided that in order to include it in the Pictionary©, I would have to weave a sample – and not use one that was the better part of 40 years old! Plus, I must admit that I find it hard to write about something unless I have woven it recently, or at least more recently that 40 years!
I used the simplest overshot threading which actually is Monk’s Belt, two blocks with no shaft shared. Some consider Monk’s Belts a type of overshot, some a separate structure, but even the splitters would agree that, when woven the traditional way, Monk’s Belt is a supplementary weft weave like overshot.
Below is the drawdown. The warp is orange and the cell weft is a lighter orange to show the intersections better; in the fabric it is the same yarn. The blue weft is the heavier thread.

Click here for the full-sized draft (a PDF will open a new window or in your list of downloaded files)
The draft tells us how to weave honeycomb but is not very illustrative of the look of the fabric that results from the draft.
Compare the drawdown with the fabric below. The warp and cell weft for this sample is 6/2 orange unmercerized cotton and the outline yarn is 3/2 Pacific blue mercerized cotton. Six shots of the 6/2 were used to weave the cells, as shown in the drawdown.

We weave two shots of the heavier blue thread, using the usual tabbies for overshot, 1 & 3 vs. 2 & 4; 6 shots of the thinner orange thread follow; we finish the sequence with two more shots of the blue thread, which are also the beginning of the next sequence.
While one block of Monk’s Belt weaves plain weave, the other forms long warp floats; these long floats pull the blue weft so that it bends around the plain weave block and compresses it – and the long warp floats are shortened. The resulting fabric alternates staggered “honeycomb” cells; in the next sequence, the block that wove plain weave now weaves long floats and the block that had long floats now weaves plain weave.
As shown in the draft and as I have already mentioned, there are 6 shots of thin orange weft per sequence, but that number can be changed. Below is a sample on the same warp that uses 3/2 black mercerized cotton with 8 picks instead of 6. The warp floats are more apparent.
Next, I decided to use the 6/2 orange cotton to outline the cells and a thinner 10/2 mercerized cotton, yellow, for the cells. This was not an original idea, but I can’t remember where I had learned about it. Below is the fabric. The orange warp ends are even more noticeable. The yellow 10/2 cotton covers the orange warp completely making the cells weft-faced.

And finally, I couldn’t resist glitz. Here is the same treadling as the original drawdown and sample, but the blue weft was replaced by a multicolor yarn from my shelf, Ausermann High Collection Holiday, 50 gm = 115 m; 82% viscose, 15% polyamid, 3% polyester.

I can imagine an evening jacket with such a fabric!
When designing with this weave, we need to remember the floats in the back. Where there are warp floats in the front, the weft floats in the back. The photo below shows the back of the 1st fabric; the orange weft floats between two plain weave blocks. An example of a weft float block is shown in the picture circled in light blue. If the floats in the back are too long, solutions could include lining a jacket, using the fabric for a pillow, etc.

There is a lot of room for experimenting with this weave; if you want to explore more, try Stacey Harvey-Brown’s book, Honeycomb Hybrids. Honeycomb for All Tastes for some interesting possibilities.
Happy Weaving!
Please email comments and questions to