A Wonder Year of Weaving - An Assessment with Answers
Marcy Petrini
June, 2021
Last month for the May 2021 blog, I posed a set of 8 questions that the study group I am leading used as a review of the first 4 months.
For these months, here are the answers. If you haven’t looked at the questions yet, you can do that now (in the May Blog, click here) and then check how well you know Emery’s “simple weave.”
Here are the 8 questions, 2 per month, that I posed to the group. The instructions are to try to answer as many as possible from knowledge, but then to look up what they don’t know, have forgotten or need to check.
How well did you answer these questions?
1. What is the difference between tabby and plain weave?
Plain weave is a fabric with the most interlacements which range from warp to weft faced.


Tabby is a perfectly balanced plain weave, 50% warp, 50% weft on both sides of the fabric, wpi = ppi. For a given yarn, the wpi is not fixed; we would sett the tabby ground for an overshot more openly than for a plain weave tabby cloth.
2. How would you adjust the warp sett to weave a weft-faced fabric?
To cover the warp and produce a weft-faced fabric, we open the sett to as low as 5 epi, depending on the size of the weft.

3. What is the best option for nice selvages on a straight twill woven as a straight draw?
Enter the shuttle on the side of the warp where the first thread is down. Every warp thread on both sides will be caught. If you forget this and you don’t catch the warp ends on both sides, reverse the entering side of the shuttle. This expects the threading to start at shaft 1 and be complete (end on an even shed).
No floating selvages are needed!

Here is how to tell on paper:
The figure below shows that when entering the shuttle from the right, there is no warp to catch the weft at the other end.


This figure below shows that when entering the shuttle from the left, there is a warp to catch with each shot.

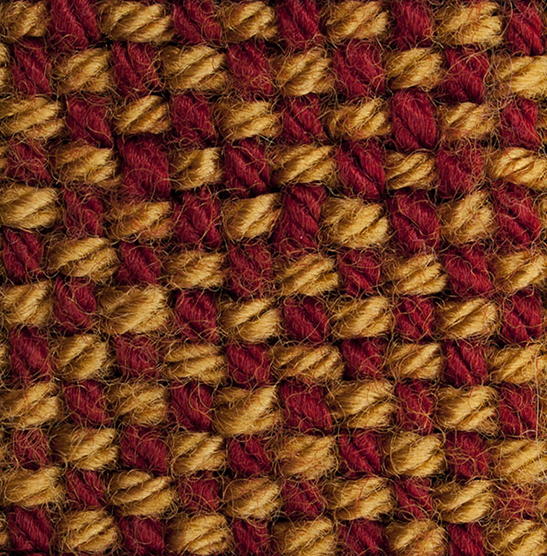
4. What is the most efficient way to tie-up a 6-treadle, 4 shaft loom for a pointed twill to be woven tromp as writ?
There is not an absolute answer to this, it does depend on the ergonomics related to the loom and your preferences, but you should always disconnect treadles that are not in use to minimize errors.
Here are two possible ways for the tie-up.
The standard way is shown in blue below (only 4 treadles in use, two are disconnected, generally one on the right, one on the left). The aqua section shows what happens if you forget the location of your repeat. You just wove 3 & 4 – what’s next, 1 & 4 or 2 & 3?

The second way to tie-up is what I prefer shown in the pink drawdown below. I use the extra 2 treadles to double tie for 4 & 3 and for 2 & 3 which are used twice. Then the treadling is across the 6 treadles.
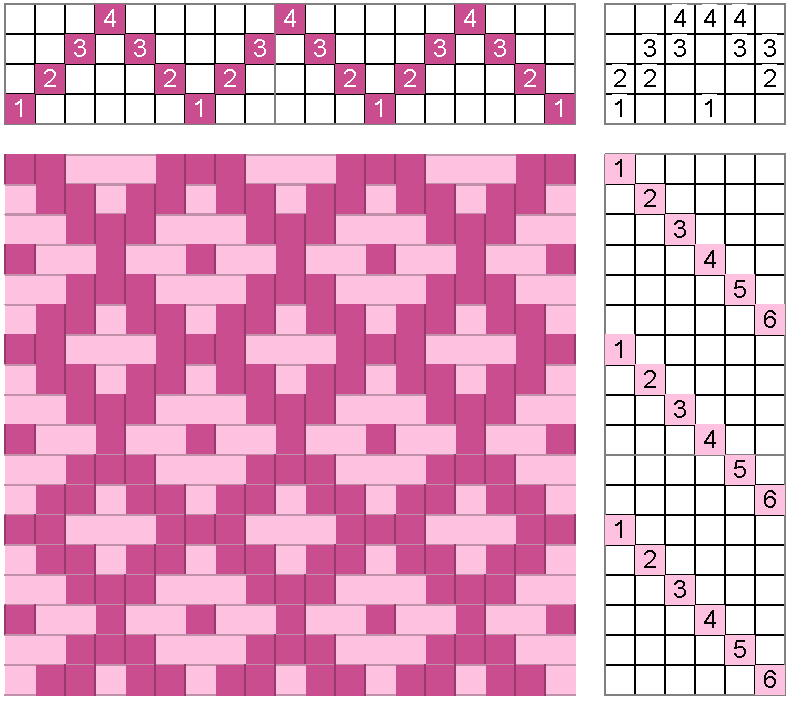
Let’s take a detour. In the drawdowns, which of course are identical, the pattern starts in the middle of the repeat. Patterns are written for convenience, but they are not necessarily how we want to weave them.
Compare the original pink drawdown on the left with the green drawdown on the right. The pattern is the same, but the threading has been adjusted so that the repeat starts with the beginning of the pattern.
Does this pattern needs floating selvages? Yes! No matter where we start, the weft won’t be caught at the selvages.

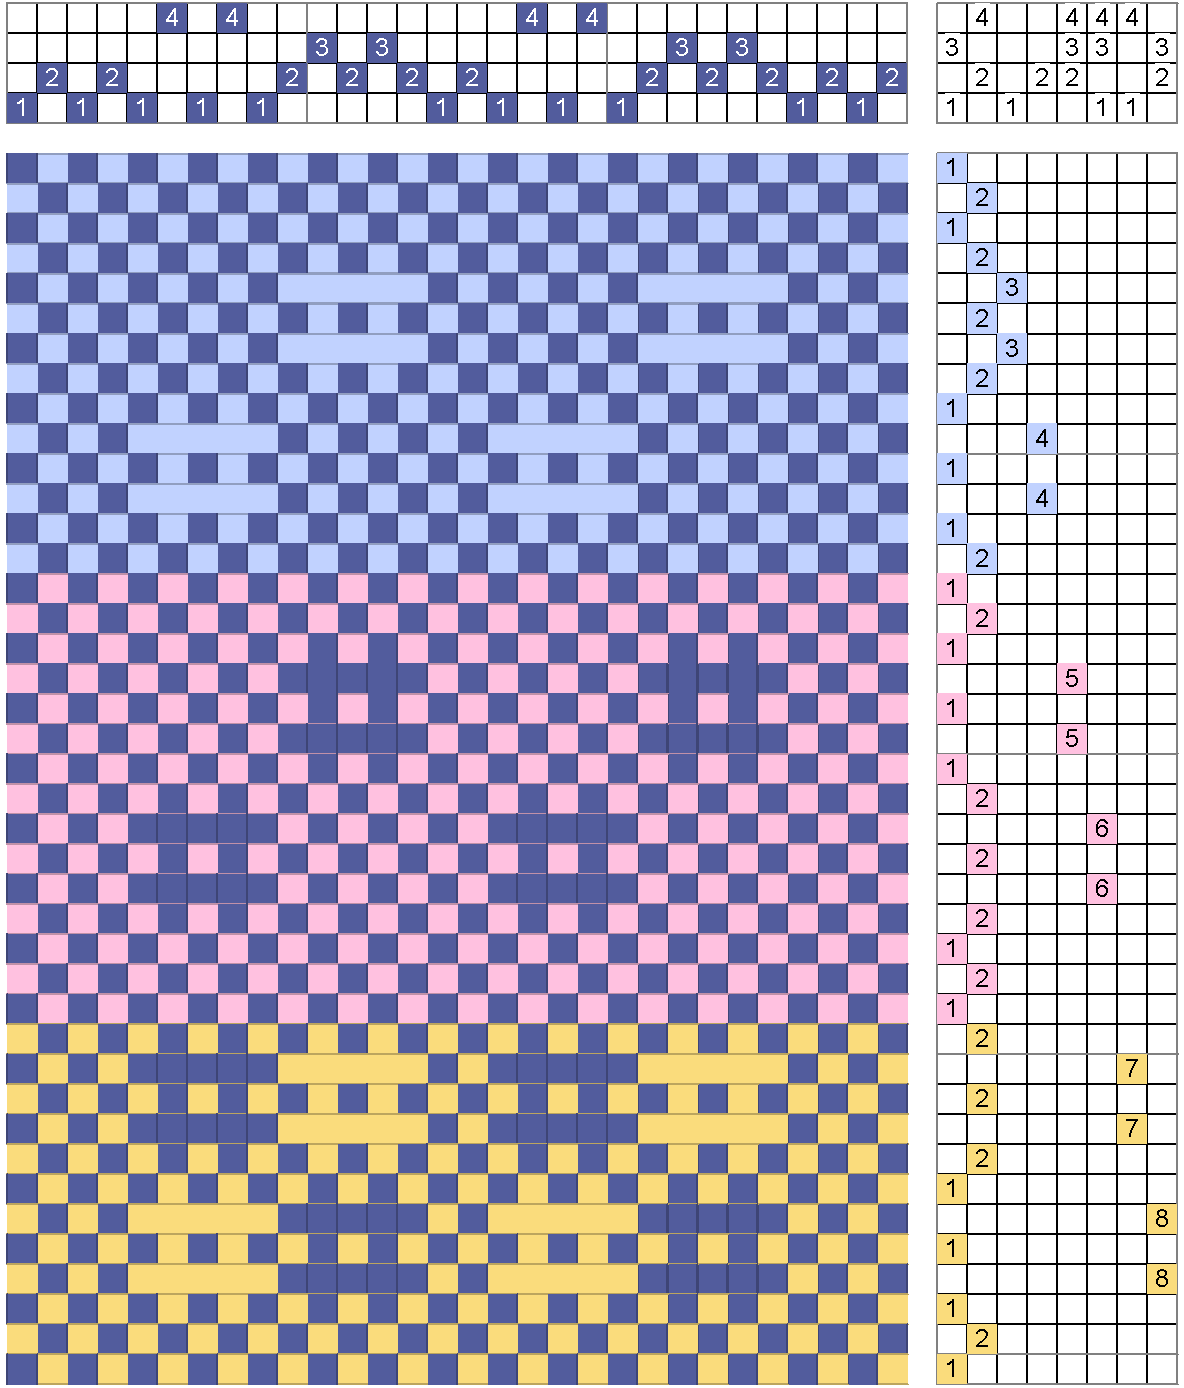
5. What is the most important difference between twills and satins?
Using Emery’s classification, twills are defined as progressive successions of floats in diagonal alignment (pink weft).
Satins are intermittent progressions of floats and suppression of the appearance of diagonals (yellow weft). The apparent diagonal is not formed by adjacent threads.

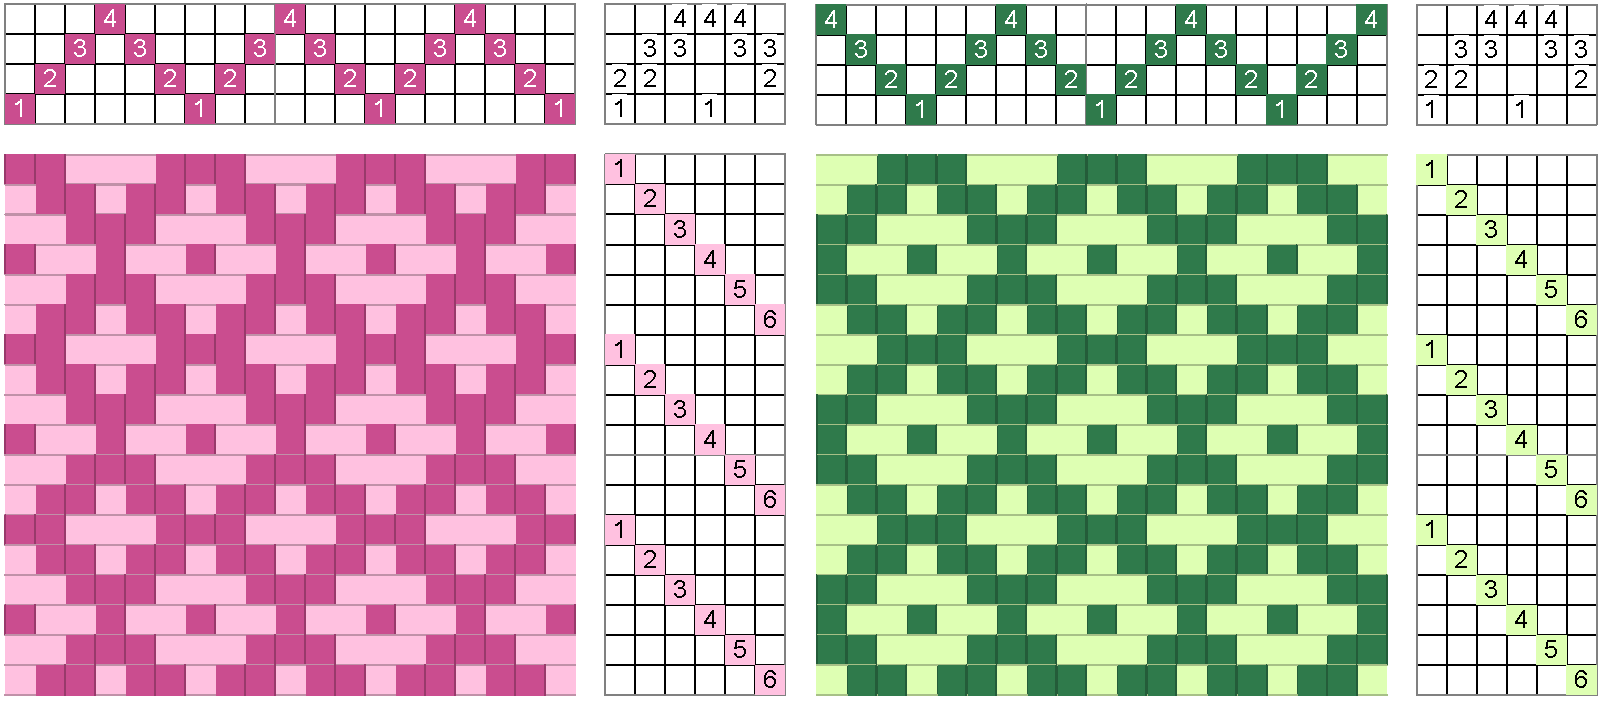
6. How would you weave plain weave across the width of a 7-shaft satin fabric?
The straight draw in the drawdown below is a 7-shaft satin.

To weave plain weave, we need to activate two sets of alternating threads in succession.
The pink threads in the threading below show that it is not possible to alternate. No plain weave across the fabric is possible.

This method works with any threading.
But the original question asked “How would you weave plain weave across the width of a 7-shaft fabric?
It depends on the fabric. First example is huck:
Huck has blocks that alternate shafts 1 and 2 as the delimiter. It is possible to weave a 7-shaft huck, but block using shaft 1 must alternate with those using shaft 2.
Below is one example: block E (2, 7) is followed by block D (1, 6).
Plain weave is woven 2 & 4 & 6 vs. 1 & 3 & 5 & 7.
The next example is Bronson Lace, drawdown below.
In Bronson Lace every block uses shaft 1, which alternates with other shafts depending on the block.
Plain weave across the fabric then will be 1 vs. all other shafts.
In this case 1 vs. 2 & 3 & 4 & 5 & 6 & 7.

Below is an example of summer and winter, a tied weave.
The tied weaves have various shafts for ties and the rest of the shafts for blocks.
Ties vs. shafts in many cases form plain weave for the ground.
Our summer & winter uses shafts 1 & 2 for ties and, in this example shafts 3-7 for blocks, one shaft per block;
S & W plain weave is 1 & 2 vs. 3 & 4 & 5 & 6 & 7.

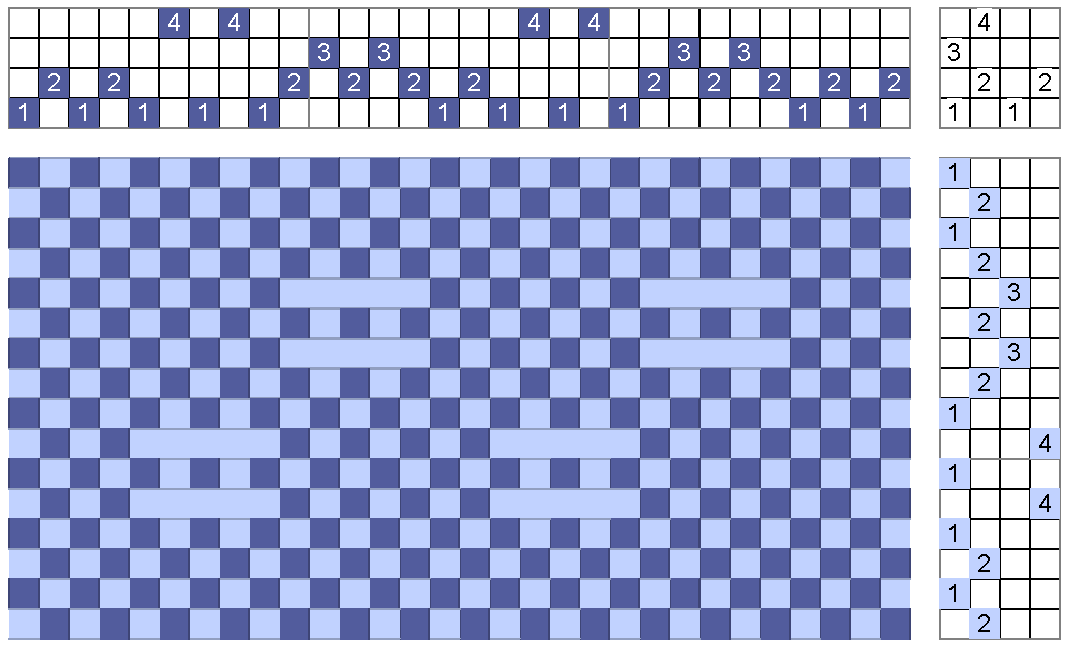
7. What is the difference between Huck and Huck Lace?
In huck (blue & pink weft in the drawdown below) when one block weaves floats, the other weaves plain weave.
In huck lace (yellow weft), one block weaves weft floats, the other warp floats.
With more than 4 shafts, the two are often combined.
8. Why is the unique difference between Huck and Bronson? (Bronson-Atwater)
In Bronson lace (the drawdown below) blocks can be combined, no matter the number of shafts.

On 4 shafts, in huck (the drawdown below) blocks cannot be combined with the same float (huck lace combines weft and warp floats as we saw above).
In huck with more than 4 shafts, blocks with the same tie-down thread can be combined.
I hope this exercise helped you in the understanding of these structures.
Happy Weaving!
Marcy
A Wonder Year of Weaving
Marcy Petrini
May, 2021
I am leading a group of adventuresome weavers in a year long quest to learn as many structures as we can. Based loosely on my monograph by that name, which was prepared for a one-day workshop I taught at Convergence in Reno, this iteration takes a whole year; we meet monthly on zoom, I provide some basic information, participants do research and weave, sometimes samples, sometimes pieces, and sometimes life gets in the way, so they skip the month weaving.
During the meeting we go over the material from the past month, we have a show and tell with pictures of the work done and then we prepare for the following month. We record it all and then it is posted on my website by month, along with the all the supplementary material (click here for the link).
We are following the weave structures as described by Irene Emery, The Primary Structures of Fabrics, and during the last four months, we have been studying what Emory calls “simple weaves” – simple not by complexity, but because they have one set of warps and one set of wefts. The weaves are: plain weave, twills, satins and float weaves derived from plain weave, sometimes called rectangular float weaves, which include the lacey weaves (lacey to me because they do not form true lace, the lace makers tell me).
Since we are done with the simple weaves, it seemed like a good time to stop and assess what we learned. In a group this varied, which include people who could be leading it to beginners, it’s good to make sure that we haven’t missed anything from the big picture.
Here are the 8 questions, 2 per month, that I posed to the group. The instructions are to try to answer as many as possible from knowledge, but then to look up what they don’t know, have forgotten or need to check.
How well can you answer these questions?
(Click here for the 9-slide PDF version.)
What is the difference between tabby and plain weave?
How would you adjust the warp sett to weave a weft-faced fabric?
What is the best option for nice selvages on a straight twill woven as a straight draw?
What is the most efficient way to tie-up a 6-treadle, 4 shaft loom for a pointed twill to be woven tromp as writ?
What is the most important difference between twills and satins?
How would you weave plain weave across the width of a 7-shaft satin fabric?
What is the difference between Huck and Huck Lace?
Why is the unique difference between Huck and Bronson? (same as Bronson-Atwater)
Happy Weaving!
Marcy
Zoom to Satins and False Satins
Marcy Petrini
April, 2021
When the pandemic lock-down took place, I was in the middle of teaching an in-person twill class at the Craft Center. At first, we were on hold, but as the pandemic continued, I was reminded of how much I missed teaching.
Enter zoom: I had read pros and cons of using it and how some things can only be taught in person. Maybe. We finished the twill class with successful projects and we embarked in a lacey weave class for the rest of 2020, again with successful projects. Using e-mails, phone calls and sending photos all helped. Well, we can’t touch the fiber or finished project, that’s true, but that’s also true for books, magazines, and the rest of the internet.
Talks, seminars, an interview, and now a study group on zoom all followed. In some ways it’s magical. I meet with people from all over the country; I have given seminars in the US as well to a wonderful guild in Canada; more seminars are scheduled – all from the comfort of my studio.
And even more important, my learning continues, not only from my own researching to teach and present, but also from students and participants. In the diverse group that comprises our study group, the breadth of knowledge is impressive.
For the study group month on satins and false satins I was reminded that sometimes I have forgotten to tell weavers that we cannot just duplicate the reverse of the tie-up to alternate the treadling between sateen (weft-dominant side) and satin (warp-dominant side). (See May and June 2017 blogs).
Let’s look at a 5-shaft satin:

The 5-shaft satin should have floats over 4 threads. In the drawdown above, at the joints between satin and sateen, the floats are longer, 5 threads.
This problem occurs regardless of the number of shafts used and also for false satins, shown below, where the float length should be 3 threads, but it’s 4 at the joints.

When we have blocks, whether of false satin as shown below, or true satin, the longer floats appear in both directions.

This may not be very obvious in the fabric, but it does break the rule of the satins and false satins, so it is worth to find an alternative.
Recently, I have been showing a way around the floats which is not standard. It is to stagger or offset the second section of the tie-up from the first. Here is an example for the 5-shft satin where the tie-up for the satin is offset from the sateen tie-up by one shaft:

This actually works as the floats in the above example are never more than 4-threads long. However, there is a much better and elegant solution: using the mirror image.
I learned about mirror images from books by Doramay Keasbey, but I had totally forgotten about it until Debbie Cummings came to the rescue! In researching satins, she found this true-and-tried method. It works for satins and false satins, for switching from sateen to satin and for blocks.
Below is the drawdown for the sateen and satin treadling for a 5-shaft satin.

The drawdown for the mirrored false satin for the two treadlings is below:

When weaving false satin blocks, all quadrants of the tie-up are mirrored as shown in the drawdown below:

Once we are comfortable with the concept of satins and false satins, it is actually easier to weave them by threading a straight draw and using the satin rules for the tie-up, mirrored for the sateen and the satin. This is shown in the drawdown below.

I am grateful for the opportunity that Zoom offers to carry on the teaching – and the learning.
Happy Weaving!
Marcy
Winter 2020: MS Covid Vax Tour
Marcy Petrini
March, 2021
Here is the scarf by that name:

The name started as a joke, but it stuck; it came about because to receive all four shots of the covid vaccination, Terry and I travelled the state of Mississippi:
Greenwood, MS (Northwest) 104 miles
Philadelphia, MS (Northeast) 78 miles
Hattiesburg, MS (Southeast) 96 miles
Natchez, MS (Southwest) 108 miles
When the vaccination was suddenly opened to our age group, way ahead of schedule, the database couldn’t easily handle the 100 fold increase in demand, so we scrambled, it took us 8 hours, but we both got our 1st shots scheduled. Our second shots were easier, but the quest did take us far from home.
At first, I thought it was crazy to have to drive all over the state to get a shot, but once we got in our car for Terry’s first shot, I was actually excited to be out and about. Our few outings in the last year have been near home.
So, we were going places! At some point in our travels I told a friend who asked about our vaccinations that we were doing a covid vax tour of Mississippi. The name stack! As we were driving to our various locations, I was looking for inspiration for a possible piece (the usual scarf) by that name. All those Southern pines make quite a spread of green. But what other color? The mighty muddy Mississippi River? Brown picket fences seen in our travels? The colors weren’t working out.
The pattern was easier to think about: as our grey car zig-zagged around the state, I imagined an undulating twill.
As we arrived in Hattiesburg pulling into the facility, the new Mississippi flag jumped out at me. The MS Covid Vax Tour piece could use those glorious colors: red, gold and blue! I could use stripes in the same proportions as those in the flag.
When I finally sat down to design the piece, I found a picture of the flag, a new flag which was just approved in November 2020.

But now I was in trouble – besides the colors, we have stars. And a magnolia.
But first things first. My scarf would be 8” wide. By measuring a picture of the flag and taking the ratios of the colors, I could decide on my color proportions. Using 20/2 silk sett at 24 epi, I could figure out my ends for each color and tweak them to make them more balanced for a total of 192 ends.
| Flag (mm) |
Scarf (") |
Warp Ends | Adjusted Ends | |
| Red | 3.2 | 1.7 | 41 | 40 |
| Yellow | 0.7 | 0.4 | 9 | 10 |
| Blue | 7.1 | 3.8 | 92 | 92 |
| Yellow | 0.7 | 0.4 | 9 | 10 |
| Red | 3.2 | 1.7 | 41 | 40 |
| Total = | 14.9 | 8 | 192 | 192 |
Back to the flag. The description said: “The new flag features a magnolia blossom surrounded by 20 stars, signifying Mississippi's status at the 20th state in the union, and a gold five-point star to reflect Mississippi's indigenous Native American tribes.”
I decided that unless I did an in-lay, I couldn’t include the magnolia. And I could design stars with more than four shafts, but that loom was going to be tied-up for a while.
Then I thought: maybe a bird’s eye twill would give me enough of a hint of stars. I played with the drawdown: the blue would have the bird’s eye twill, the red and yellow the undulating twill. I adjusted the warp ends of the colors to match the pattern and I added a gold stripe in the middle of the blue to represent the Native Americans tribes.
Here is the final drawdown, missing the ending red because of space constraints.
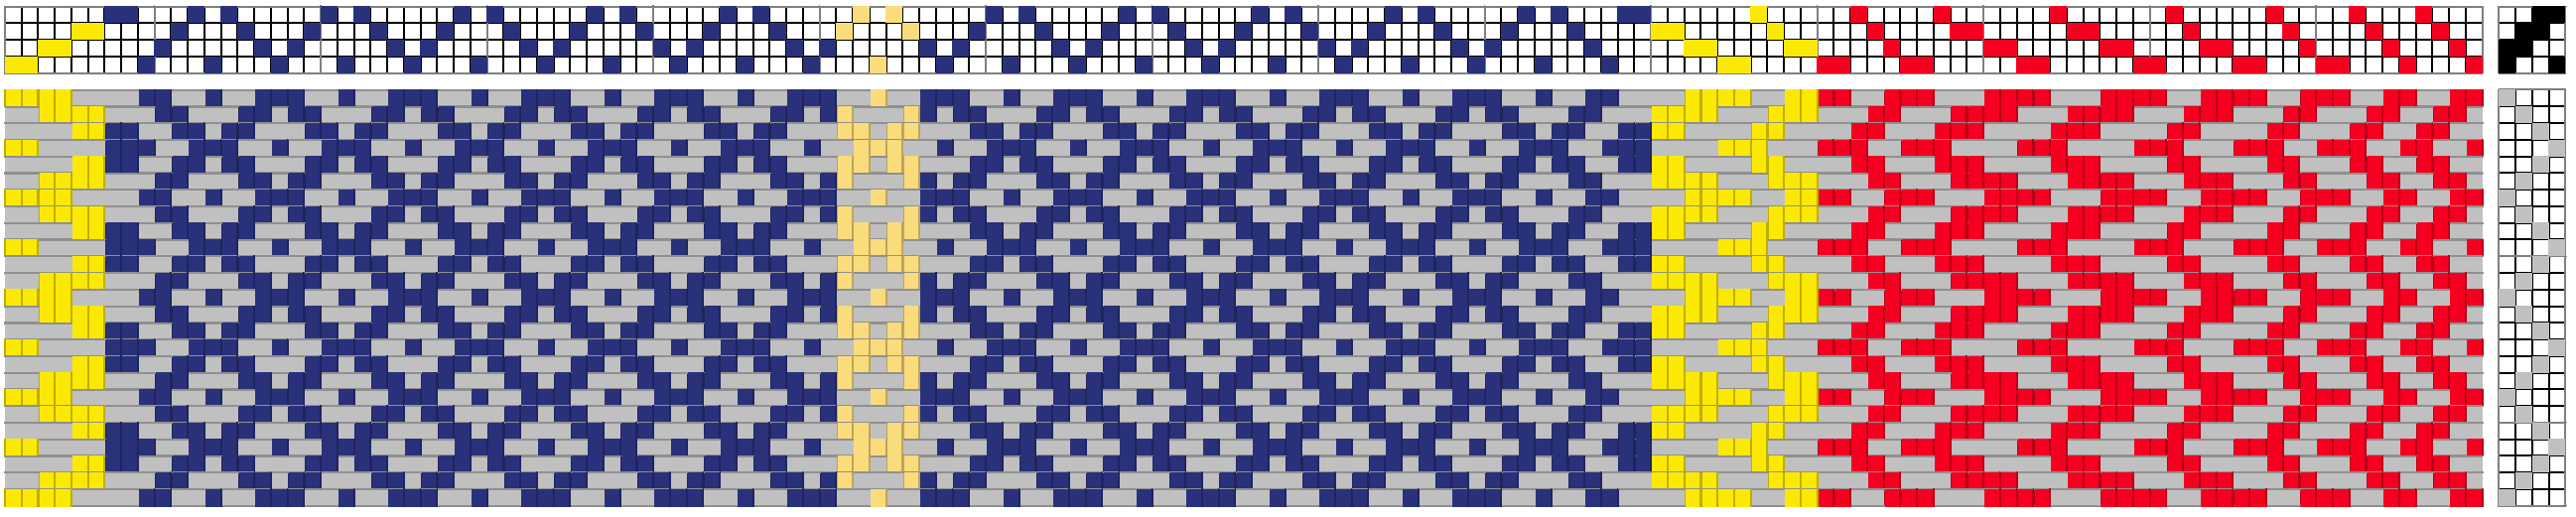
The right and left side of the red and yellow are mirror images of each other. The “stars” on either side of the gold “star” in the middle are in two staggered rows, each 5 motifs, for a total of 20 for each repeat, 20 representing Mississippi as the 20th state in the nation.
I started weaving with a grey cotton, to represent our car, but the bright colors of the flag washed out too much. I found an 8/2 white silk from Henry’s Attic on my shelf, which was perfect: it left the colors bright and made the pattern stand out more, and, given that the scale is rather small, that was good, too.
It was only while I was weaving that it dawned on me that the white was from the magnolia – serendipity? Or was my sub consciousness at work?
Here are closes up of the two sides of the scarf:


We are all vaccinated now and the two weeks have lapsed and we hope to go back to a more “normal” life… whatever that is!
Happy Weaving!
Marcy
Winter 2020: A Glimmer of Hope
Marcy Petrini
February, 2021
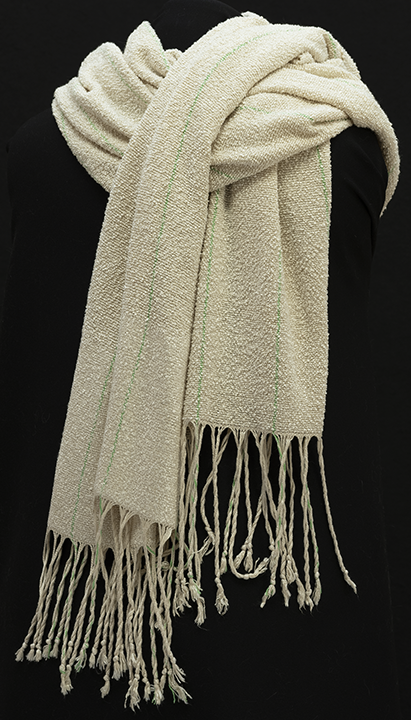
Here is the shawl by that name:
With winter come the holidays and with the holidays come parties, travel and family get together, which led to more Covid-19 cases and more deaths. Unless you stay home and miss it all.
In the middle of this depressing season, came a glimmer of hope: vaccines approved for emergency use, which basically means that they are effective, but there is a lot we don’t know about them, they are mRNA vaccines, they work differently than the usual flu vaccines. mRNA vaccines have been in the making for a long time, notably for the SARS-I, but when that epidemic was averted, funding for the vaccine type decreased and thus it took longer for the SARS-II, aka Covid-19 vaccine to come into being.
Colleagues in the health care field were getting vaccinated; they talked about the few side effects, and the relief that they felt having some protection. Just a few months and we, too, could be vaccinated.
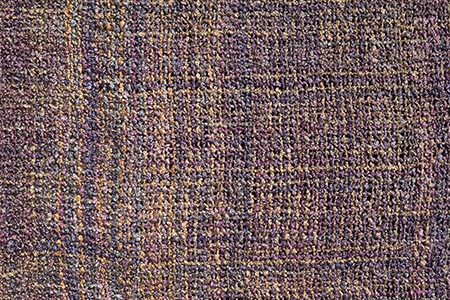
That glimmer of hope translated to green threads to me. Green seems to be a common color for hope. I used 2 threads of 10/2 green silk from RedFish Dyepworks. The fabric is plain weave, so in order to have a solid line of green, I needed two threads. Here is a close-up of the fabric:

And white is associated with winter, I guess because of the snow. Even I think of white for winter, although I didn’t see snow until I was 13 and then it was not love at first sight – my first step into the white stuff resulted in my sliding into the snow with a sore bottom. And I have lived in the South for over 40 years where I can count on my one hand, the number of snow storms we have had, most of which were gone overnight. Ironically, while I was weaving this piece, Mississippi had the worst snow storm that I can remember. The city shot down for a week.
The white warp was easy enough; I have a silk from my stash, close to 20/2. The weft I had to think about. I wanted texture, but not hair yarn, for example. I thought of textured handspun, but I only have a couple of bobbins in reds; I would have to spin some, not a good option. I looked through my shelf that holds black and white yarns and there was my answer: white silk bouclé.
I had bought several skeins of silk bouclé dyed for the colors of the Convergence® in Long Beach, CA by RedFish Dyeworks. I loved the yarn feel and look; I wove this shawl with it:
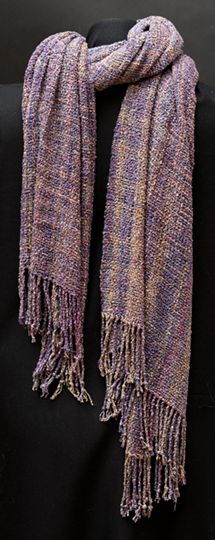
And here is a close-up:
At the Convergence® Marketplace, I wanted to buy more silk bouclé from RedFish in different colors, but they only had 5 skeins of white. I bought those, thinking that I would dye them.
The dyeing never occurred, but the white yarn was perfect for this project. I thought of using it for warp and weft as I had done for the colorful shawl above, but 5 skeins wasn’t enough: each has 150 yards for 100 grams. I used nearly 4 for the weft alone.
I opened up the sett for the 10/2 silk warp to 18 epi to accommodate the larger weft. There are 5 two-threads green silk threads dispersed over the width of the shawl, 22” on the loom; that translates to the green every 4th inch, except at the edge which ends with 3” of white.
The final shawl is 19” by 95”. This is one piece out of the Covid-19 series that I will wear, maybe to concerts for the 2021-22 season.
Stay safe and happy weaving!
Marcy